How to use Lua scripts
Setup
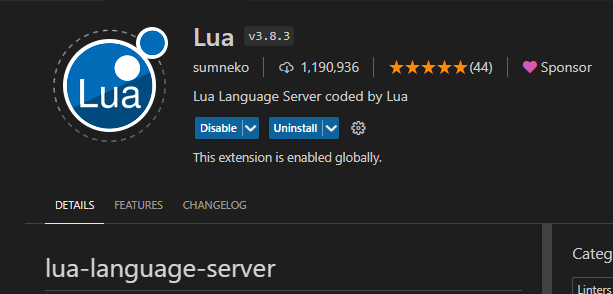
For Lua scripting, I suggest utilizing Visual Studio Code with the Lua extension installed (sumneko). This extension enables autocomplete functionality, leveraging our library file for enhanced productivity. First create a dedicated folder where you will have emdrive library stored (e.g. D:\LuaLibraries)
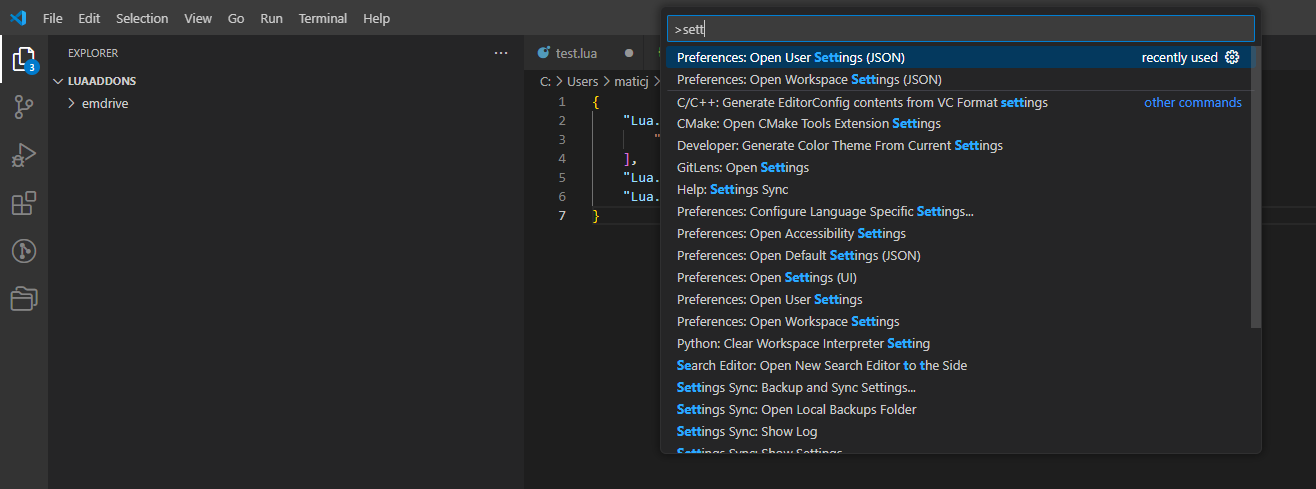
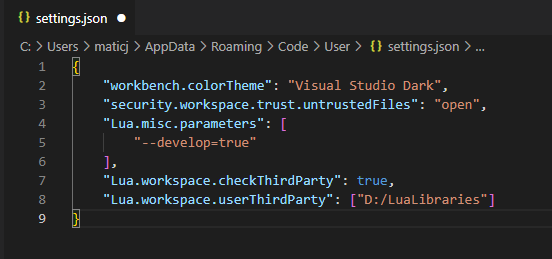
After that you need to configure the developer mode and add the path to the library in vs code, to do that you need to have VS-Code open and clikc CTRL+P. A search bar will appear where you need to write: ">settings", then you select "Open User Settings (JSON)" like shown in the picture bellow:
"Lua.misc.parameters": [
    "--develop=true"
],
"Lua.workspace.checkThirdParty": true,
"Lua.workspace.userThirdParty": ["path_to_our_library"]
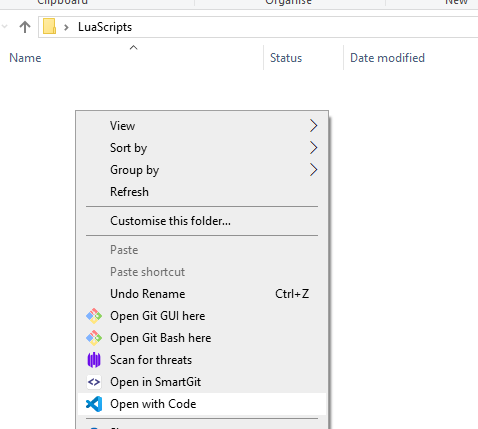
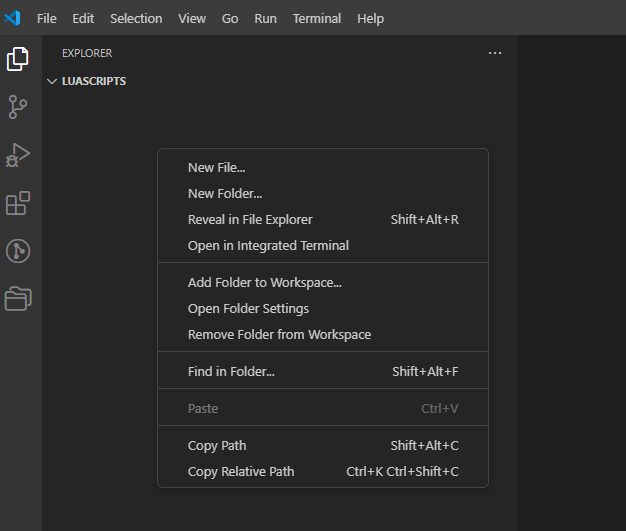
To start scripting you need to first create a folder and then open up the folder, where you right click Open with Code, this will open the VS-code editor and the workspace will be already prepared.
In the explorer window right click and create a new file called firstscript.lua
When you have a new workspace (new folder) where you will need to use our emdrive library you need to tell VS-code the path. To do this you have 2 options.
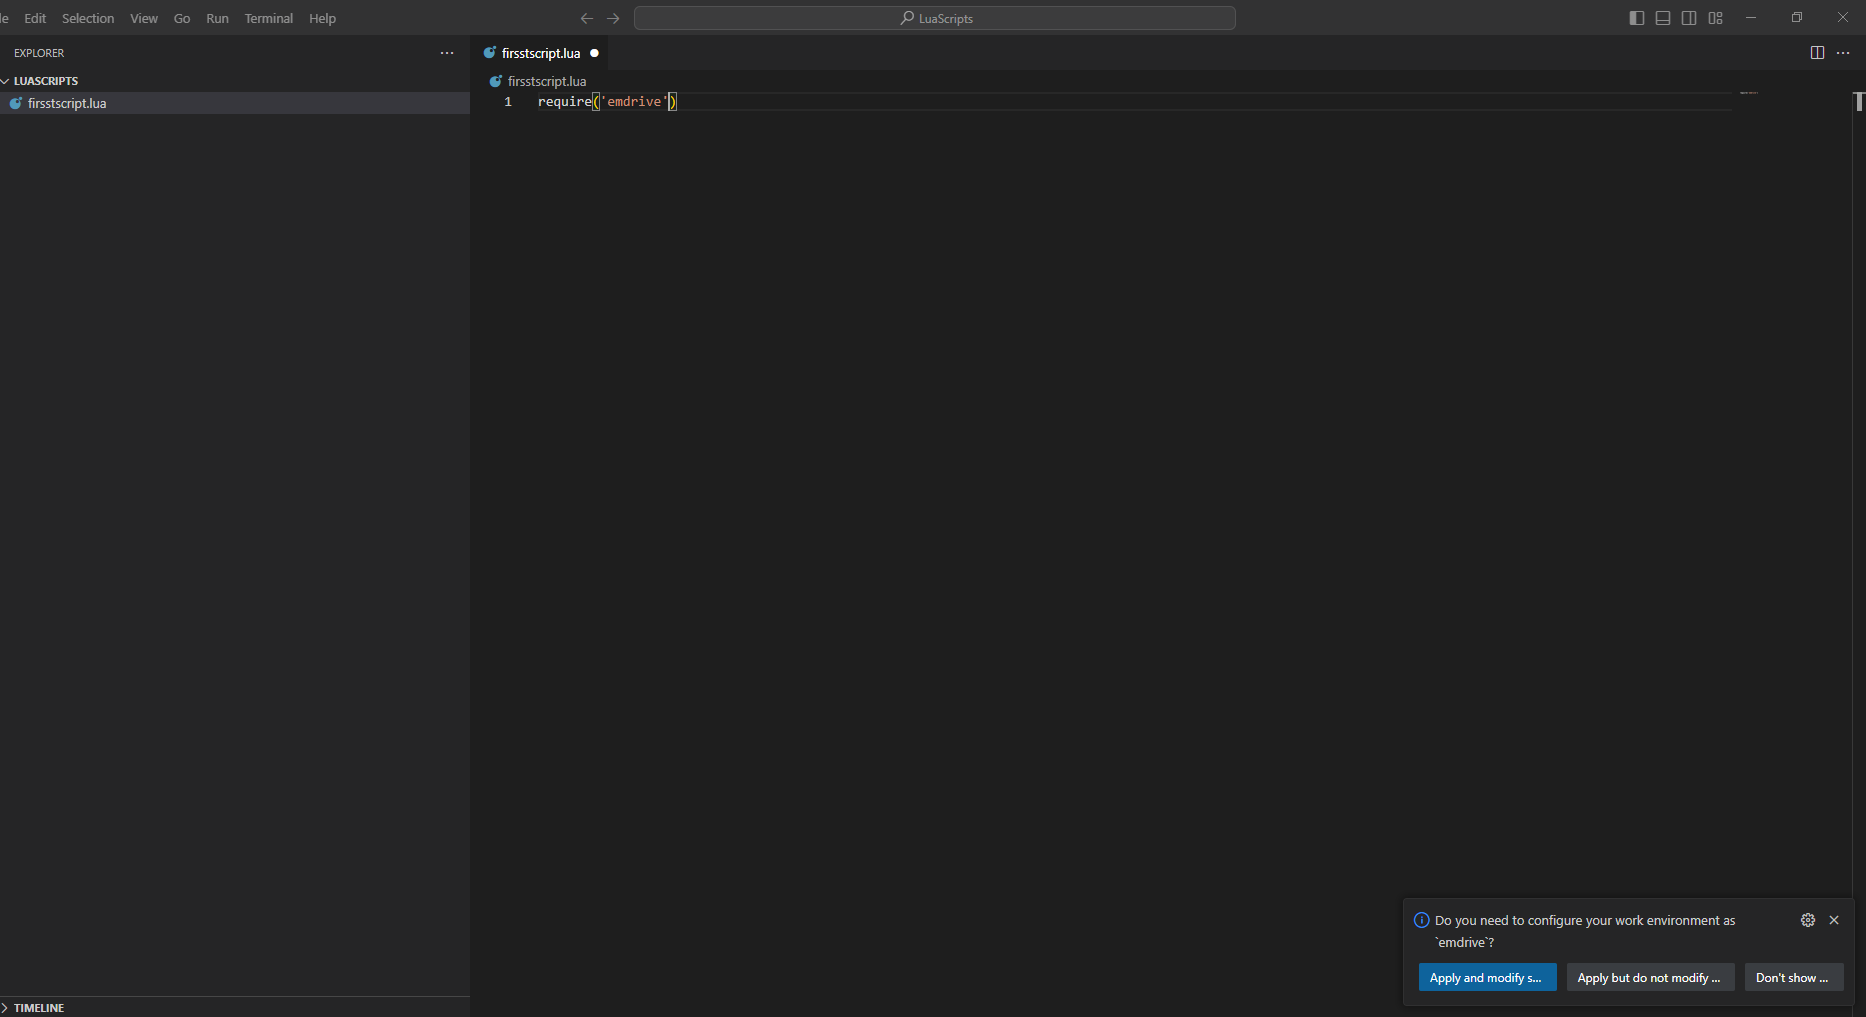
First option is to write the following code in the empty script.lua (or in this example firstscript.lua)
require('emdrive')A pop up window will appear in the bottom right corner, where you click "Apply and modify". After that you need to delete the require('emdrive'). If you look closely when clicked apply you get a new folder names .vscode. In that folder there is a settings.json which contains the path to the library. The second option is to create the mentioned folder and file manualy (with the library path).
Examples
Example 1: "Hello World"
Description:
Print "Hello World" every 100ms to IO_Output.
For the script to work you need to have 2 functions "Initialite" and "Loop".
Copy the following code to an example.lua file.
function Initialize()
	LoopPeriodMs = 100
end

function Loop()
    IO.Write("Hello World ")
end
To load the script on the inverter you need to go into 0x2040 0x05 - Script, where you select write from file and then click "...". A pop up window appears where you then located the saved script and click "Open", after that you click write.
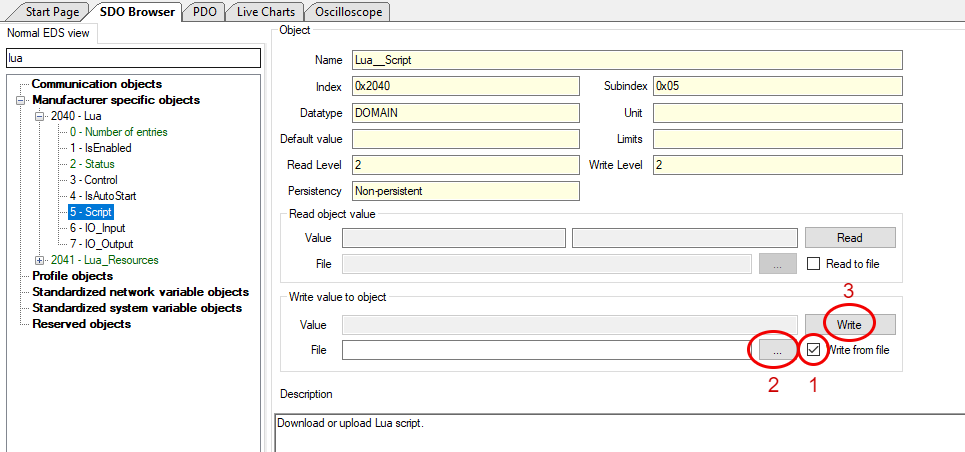
If the script is correctly written you can se under object 0x2040 0x02 - Status the value "3" - Which means that the downloaded file is valid. To run the script you need to set object 0x2040 0x03 - Control = 2. You can see in status if the script is running the value should be "5".
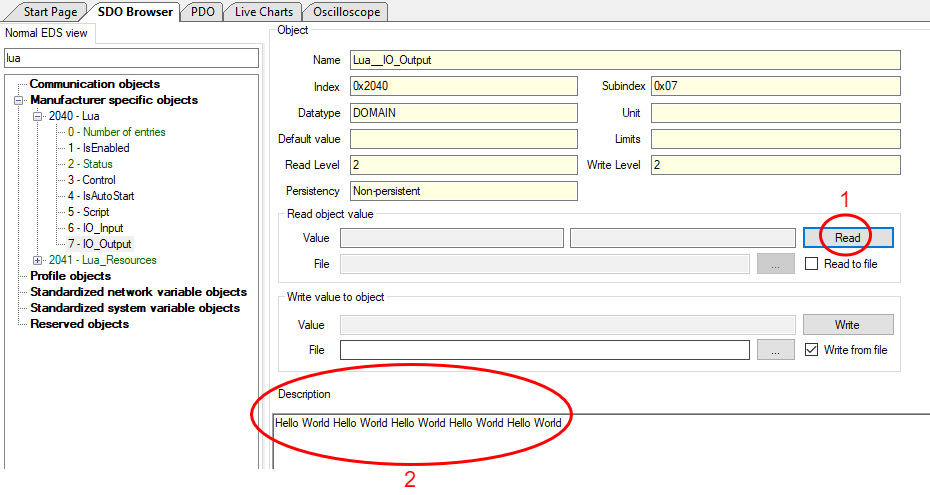
To se the the "Hello World" you need to go to object 0x2040 0x07 - IO_output, where you can click read and the string will appear in the Description window.
Example 2: Data types
Example 3: Inputs/Outputs
Example 3.1: Use of digital inputs & outputs
Turn low side 1 - ON when switch on digital pin 1 is switched ON.
function Initialize()
	LoopPeriodMs = 10
end

function Loop()

    local switch = Digital.Get(DIGITAL_IN_1)

    if switch == 1.0 then
        Digital.Set(LOW_SIDE_1, 1)
    else
        Digital.Set(LOW_SIDE_1, 0)
    end
end
Example 3.2: Use of analog inputs
Print analog value of analog input 1 when switch on digital pin 1 is switched ON.
function Initialize()
	LoopPeriodMs = 10
end

function Loop()

    local switch = Digital.Get(DIGITAL_IN_1)

    if switch == 1.0 then
        local rawVal = Analog.Get(ANALOG_IN_1)
        IO.Print(rawVal)
    end
end
Example 4: Blink LED
Example 4.1: Blink LED - "delay"
Loop period is set to 1000ms
LED is connected on low side 1.
Blink LED every 0.5s with Time.WaitMs().
function Initialize()
	LoopPeriodMs = 1000
end

function Loop()

    local ledState = Digital.Get(LOW_SIDE_1)

    if(ledState == 0.0) then
        Digital.Set(LOW_SIDE_1, 1.0)
    else
        Digital.Set(LOW_SIDE_1, 0.0)
    end

    Time.WaitMs(500)

end
Now set the LoopPeriodMs = 100
We see that the script does not run anymore, we get under status the number "6", which means "Script timed out and was stopped".
With the function Time.WaitMs(), we wait in the code for the specified time (in this example 0,5s). But we specified that the script must loop through under 100ms, and thus we get an error. Using tthe function Time.WaitMs() we have to be very careful.
Example 4.2: Blink LED - using loop time
We want to blink the LED every 0.5s but still want to have the main loop to be executed every 10ms. We achive this with the following code: We count every loop from 1 to 50 and multiply the counter with the loop period. Then we divide the number with 500 and if the reminder is equal to 0 than we toggle the output.
Main_loop_period = 10
Counter = 1


function Initialize()
	LoopPeriodMs = Main_loop_period
end

function Loop()

    if ((Counter)*Main_loop_period)%500==0 then

        local ledState = Digital.Get(LOW_SIDE_1)

        if(ledState == 0.0) then
            Digital.Set(LOW_SIDE_1, 1.0)
        else
            Digital.Set(LOW_SIDE_1, 0.0)
        end

    end

    if Counter<50 then
        Counter=Counter+1
    else
        Counter=1
    end

end
Example 4.3: Blink LED - using processor time
The script initializes a start time variable and defines two functions. In the Loop function, the script checks if the StartTime is nil and if so, sets it to the current time in milliseconds.
The Loop function then continuously gets the current time in milliseconds. If 500 milliseconds have passed since the StartTime, it resets the StartTime to the current time.
It then gets the state of a digital output LOW_SIDE_1.
If LOW_SIDE_1 is off (state is 0.0), it turns it on by setting its state to 1.0.
If LOW_SIDE_1 is on (state is not 0.0), it turns it off by setting its state to 0.0.
This process repeats every 500 milliseconds, toggling the state of LOW_SIDE_1 each time.
StartTime = nil

function Initialize()
	LoopPeriodMs = 10
end

function Loop()

    --Execute only once at the start of the loop
    if(StartTime == nil) then
        StartTime = Time.GetMs()
    end

    --Chechk every loop what is the time
    local CurrentTime = Time.GetMs()

    if (CurrentTime - StartTime >= 500) then
        StartTime = CurrentTime

        local ledState = Digital.Get(LOW_SIDE_1)

        if(ledState == 0.0) then
            Digital.Set(LOW_SIDE_1, 1.0)
        else
            Digital.Set(LOW_SIDE_1, 0.0)
        end

    end
end
Example 5: CAN send
Example 5.1: (CAN send simple message)
We want to send a simple CAN message frame from lua script every 100ms with ID = 0x205 and data value 500 using the first 2 bytes.
For this we can use the example 4.3 as a template. We need to add a CanID variable, the CAN.Initialite() function. For sending we only need the paramater CAN_TX_ONLY, messages will not be extended and the filters can also be 0, because as mentioned we will only send.
When that is finished we delete the code for toggling the output and create a custom function which will be called every 100ms.
The function takes in one argument which will be called Data_raw, that data is then split into 2 bytes and sent via the CAN.Send() function.
CanID = 0x205

StartTime = nil

function Initialize()

    CAN.Initialize(CAN_TX_ONLY,false,0,0)

	LoopPeriodMs = 10
end

function Loop()

    --Execute only once at the start of the loop
    if(StartTime == nil) then
        StartTime = Time.GetMs()
    end

    --Chechk every loop what is the time
    local CurrentTime = Time.GetMs()

    if (CurrentTime - StartTime >= 100) then
        StartTime = CurrentTime
        SendData(500)
    end
end

function SendData(Data_raw)
    local val = Data_raw
    local byte0 = math.floor(val) & 0xFF
    local byte1 = (math.floor(val) & 0xFF00) >> 8
    CAN.Send(CanID,{byte0,byte1,0,0,0,0,0,0})
end
Example 5.2 : CAN send extended message (J1939)
We will do the same as in example 5.1 except we will send an extended message (It will be a J1939 message PH3 - the data order might be different).
ID = 0x18FF8203.
The only thing we need to change is 2 lines, we need to change the CanID and in the CAN.Initialize() function the boolean value to true. If we change only the CanID then the message will still be sent out but instead with ID 0x18FF8199 it will be 0x199 (the last 3 digits will be the ID).
CanID = 0x18FF8199
CAN.Initialize(CAN_TX_ONLY,true,0,0)
Example 6: CAN receive
Example 6.1 : CAN receive
In this example we will turn ON and OFF a LED that is connected on low side 1.
The Can ID has to be 0x123 and we will send only one byte of data. If the value of data is 1 then the LED will be turned ON, otherwise it will be turned OFF.
To use the CAN receive function we need to change the CAN.Initialite() and add a function called "CAN.Received(message) end". With the following code we always go into the CAN.Received() function when a message is received and then we check if the ID is correct.
function Initialize()
    CAN.Initialize(CAN_RX_TX,false,0,0)
	LoopPeriodMs = 10
end

function Loop()


end

function CAN.Received(message)
    if (message.ID == 0x123) then
        IO.Print(" Data1: ", message.Data[1])
        if(message.Data[1] == 1) then
            Digital.Set(LOW_SIDE_1, 1.0)
        else
            Digital.Set(LOW_SIDE_1, 0.0)
        end
    end
end
We can also add a filter so we only go into the CAN.Received() when the message has a proper ID. We achieve this with the following code.
function Initialize()
    CAN.Initialize(CAN_RX_TX,false,0x123,0x123)
	LoopPeriodMs = 10
end

function Loop()


end

function CAN.Received(message)
    --if (message.ID == 0x123) then
    IO.Print(" Data1: ", message.Data[1])
    if(message.Data[1] == 1) then
        Digital.Set(LOW_SIDE_1, 1.0)
    else
        Digital.Set(LOW_SIDE_1, 0.0)
    end
    --end
end
Example 7: Read & Set CANopen objects
Within a lua script you can read and modify CANopen objects, just like with the configurator tool. In this example we will use an analog input (HW AIN1 )as throttle and set the 0x3010 0x05 - VelocityRef object. We will also read the same object and print it to the lua output. We will also limit the max RPM inside lua with math library, if a problem with the analog reading appears the motor wont run away.
0V = 0RPM
5V = 200RPM
For this example to work you need an inverter that is configured to work with the connected motor. You need to be first able to spin it in velocity mode using the configurator.
When you start the script go to operational and turn on PWMs manually.
If the analog throttle is damaged (short or broken circuit), there is no safety implemented. If there is a break no voltage will be applied RPM = 0. But if there is a short than the inverter will get full 5V on the analog input RPM = MAX. This is why we need to implement some safety features (will be shown in example 8).
VelocityRef = {0x3010, 0x05}

function Initialize()
	LoopPeriodMs = 10
end

function Loop()


    local rpm = Analog.Get(ANALOG_IN_1) * 40
    rpm = math.min(rpm,200)

    CANopen.SetObjectValue(VelocityRef, rpm)

    local VelRef_from_CANopen = CANopen.GetObjectValue(VelocityRef)

    IO.Print(VelRef_from_CANopen)
end
Example 8: Demo application
Example 8.1 : Demo application using CANopen objects.
We will use HW AIN1 for throttle input - potenciometer 0-5V.
Min RPM = 0 = 0.5V
Max RPM = 200 = 4.5V
If throttle voltage is bellow 0.2V and above 4.8V we stop the motor (short and break protection).
If voltage is bellow 0.5 we enable the PWMs
function Initialize()

    CANopen.SetObjectValue(VelocityRef, 0) -- Set Velocity ref to 0
	CANopen.SetObjectValue(ControlMode, 1) -- Set velocity mode
	CANopen.SetNMTState(CO_OPERATIONAL)    -- Go into operational mode

	LoopPeriodMs = 100
end

function Loop()
    local throttleVoltage = Analog.Get(ANALOG_IN_1)
    -- Decide whether to enable or disable the motor
    if Digital.Get(DIGITAL_IN_1) == 1 then
        -- only enable if voltage on analog in 1 is < 0.5 V so the motor does not start ang goes to high RPM
        if (throttleVoltage < 0.5) then
            CANopen.SetObjectValue(PwmControl, 1)
        end
    else
        CANopen.SetObjectValue(PwmControl, 0)
    end

    if (throttleVoltage > 0.2 and throttleVoltage < 4.8) == true then
           -- Map values 0.5 - 4.5 V to 0 - 200 RPM and
            local rpm = (throttleVoltage - 0.5) / 4 * 200
            rpm = math.min(rpm, 200)
            rpm = math.max(rpm, 0)
            CANopen.SetObjectValue(VelocityRef, rpm)
    else
        CANopen.SetObjectValue(VelocityRef, 0)
        CANopen.SetObjectValue(PwmControl, 0)
    end
end
Example 8.2 : Demo application using dedicated motor library.
Min RPM = 0 = 0.5V
Max RPM = 200 = 4.5V
If throttle voltage is bellow 0.2V and above 4.8V we stop the motor (short and break protection).
If voltage is bellow 0.5 we enable the PWMs.
With the use of the motor library the code is easier to read and write than example 8.1.
function Initialize()

    Motor.SetReferenceVelocity(0)       -- Set Velocity ref to 0
	Motor.SetControlMode(VELOCITY_MODE) -- Set velocity mode
	CANopen.SetNMTState(CO_OPERATIONAL) -- Go into operational mode

	LoopPeriodMs = 100
end

function Loop()
    local throttleVoltage = Analog.Get(ANALOG_IN_1)
    -- Decide whether to enable or disable the motor
    if Digital.Get(DIGITAL_IN_1) == 1 then
        -- only enable if voltage on analog in 1 is < 0.5 V so the motor does not start ang goes to high RPM
        if (throttleVoltage < 0.5) then
            Motor.Enable()
        end
    else
        Motor.Disable()
    end

    if (throttleVoltage > 0.2 and throttleVoltage < 4.8) == true then
           -- Map values 0.5 - 4.5 V to 0 - 200 RPM and
            local rpm = (throttleVoltage - 0.5) / 4 * 200
            rpm = math.min(rpm, 200)
            rpm = math.max(rpm, 0)
            Motor.SetReferenceVelocity(rpm)
    else
        Motor.SetReferenceVelocity(0)
        Motor.Disable()
    end
end
Example 9: Throttle script (state - machine)
We will control the throttle using a potentiometer on Analog_IN_1, which will have short and break circuit protection implemented. We will also have a deadband of 0.3V. The minimum speed shall be 0 RPM and the max 300 RPM (limits).
The motor will only spin if the digital pin 1 is connected - we will have a switch ON/OFF.
The motor direction can be changed with a switch on digital pin 3.
The actual rpm is set through the objects 0x3020 0x0D - Forward_max_speed and 0x3020 0x0E - Reverse_max_speed.
If the motor spins at Forward max speed and you switch the direction with the switch then it will spin at Reverse max speed
There will be LED light connected to HS1 which will be for diagnostic. When the system is working it will be turned on. If the system is in error mode it will blink.
ERRO2 = blink 2 times then pause
ERRO3 = blink 3 times then pause
Working voltage range
Min_RPM = 0, at Min_Volt = 0.5V
Max_RPM = 200, as Max_Volt = 4.5V
DeadBand = 0.3V
This means that if voltage goes (bellow Min_RPM - DeadBand)
ERROR1 => Out of bounds
ERROR2 => Analog_In_1 < Min_Volt- DeadBand
ERROR3 => Max_Volt + DeadBand < Analog_In_2
The application will send a standard CANopen error message on 0x80 + nodeID every 100ms while in error state. There will also be TPDO message on 0x180 + nodeID which will send out the warrning code every 100ms while in start state.
0x80 + nodeID message will have a data length of 8 bytes. And the mapping is as follows:
byte0:
bit0 = Throttle potentiometer error
bit1 = Throttle potentiometer break circuit error
bit2 = Throttle potentiometer short circuit error
0x180 9 nodeID message will have a length of 8 bytes. And the mapping is as follows:
byte0: warning code
Warning code:
0x01 Motor is disabled, due to potentiometer not in min position
--[[
@file Example_9
@brief User manual examples
@author Matic Jehart
@date 05.07.2024
@version V1.0.0
]]


MAX_RPM = 300
MIN_RPM = -300


-- Objects
FORWARD_MAX_SPEED_ID = {0x3020, 0xD}
REVERSE_MAX_SPEED_ID = {0x3020, 0xE}
LED_ID 				 = {0x30A4, 0x02}


-- Inputs
ENABLE_SW 	 = DIGITAL_IN_1
DIRECTION_SW = DIGITAL_IN_2
THROTTLE_IN  = ANALOG_IN_1
DIRECTION_IN = DIGITAL_IN_3


-- Voltage thresholds
THROTTLE_MIN_V = 0.5
THROTTLE_MAX_V = 4.5
DEADBAND 	 = 0.3


ERROR	  = 0
ERROR_reg = 0
WARNINGS  = 0


StartTime1	= nil
StartTIme2	= nil
StartTime3 	= nil
StartTime4 	= nil
FlagCounter = 0


DIN		  = {ON = 1, OFF = 0}
LED 	  = {OFF = 0x0, ON = 0x1}
DIRECTION = {FORWARD = 1, REVERSE = 0}

-- Application FSM
Application = {}


function Initialize()

	CAN.Initialize(CAN_TX_ONLY,false,0,0)

	Application.NextState = "Idle"

    Motor.SetReferenceVelocity(0)
	Motor.SetControlMode(VELOCITY_MODE)

	LoopPeriodMs = 10
end


function Loop()
	Application[Application.NextState]()
end


Application.Idle = function ()

    local ledValue = CANopen.GetObjectValue(LED_ID)

	if ledValue == 1 then
		CANopen.SetObjectValue(LED_ID, 0)
	end

	CANopen.SetNMTState(CO_OPERATIONAL)
	Application.NextState = "Start"
end


Application.Start = function ()


    -- IF enable switch is off go to stop state
    if (Digital.Get(ENABLE_SW) == DIN.OFF ) then
		Application.NextState = "Stop"
		return
	end


    -- Get voltage
	local throttleVoltage = Analog.Get(THROTTLE_IN)


    -- Go into error state if throttle voltage is out of bounds
    if OutOfBounds(throttleVoltage, (THROTTLE_MIN_V - DEADBAND), (THROTTLE_MAX_V + DEADBAND)) == true then
		ERROR = (ERROR or 0) | 1
		Application.NextState = "Error"
		return
	end


    -- Check that voltage is bellow minimal throttle voltage - so that the motor does not start at high speed
	if Motor.GetState() == MOTOR_OFF then
		if throttleVoltage < (THROTTLE_MIN_V) then
            Motor.Enable()
			WARNINGS = WARNINGS & Negate_Xbit(1, 8)
            return
		else
			WARNINGS = (WARNINGS or 0) | 1
        end
	end

	-- Only set velocity reference when pwms are enabled
	if ((Motor.GetState() == MOTOR_RUN) and (throttleVoltage >= 0.5)) then
		-- Calculate Voltage
    	--local rpm = ((throttleVoltage - THROTTLE_MIN_V) * MAX_RPM) / (THROTTLE_MAX_V - THROTTLE_MIN_V)
		local rpm = ((throttleVoltage - THROTTLE_MIN_V) * GetMaxSpeed()) / (THROTTLE_MAX_V - THROTTLE_MIN_V)
    	-- Limit RPM
    	rpm = math.min(rpm, MAX_RPM)
    	rpm = math.max(rpm, MIN_RPM)
		IO.Print("REF: ", rpm)
    	-- Set ref
		Motor.SetReferenceVelocity(rpm)
	end

	-- Send warnings every 100ms
	local CurrentTime = Time.GetMs()
	if((StartTIme2 == nil) or (CurrentTime-StartTIme2) >= 100) then
		SendWarnings()
	end
end


Application.Stop = function ()
	Motor.Disable()
    --When eneble sw is activated go to start state
	if (Digital.Get(ENABLE_SW) == DIN.ON) then
		Application.NextState = "Start"
	end
end

Application.Error = function ()

    Motor.Disable()
	Motor.SetReferenceVelocity(0)

	local ledValue = CANopen.GetObjectValue(LED_ID)
    local throttleVoltage = Analog.Get(THROTTLE_IN)
	local ErrorBlinkCounter = 0
	local CurrentTime

	--If bit 0 = 1 than OutOf Bounds is detected
	if (ERROR & 1) == 1 then
		if throttleVoltage < (THROTTLE_MIN_V - DEADBAND) then
			ERROR = ERROR | 2
			ERROR_reg = ERROR_reg | 1 -- set the generic error register
		elseif throttleVoltage > (THROTTLE_MAX_V + DEADBAND) then
			ERROR = ERROR | 4
			ERROR_reg = ERROR_reg | 1 -- set the generic error register
		else
			-- Clear ERROR bit 0, 1, 2
			ERROR = ERROR & Negate_Xbit(7, 16)
			-- Clear the generic error register
			ERROR_reg = ERROR_reg | Negate_Xbit(1, 8)
		end
	end

	-- Send Errors every 100ms
	CurrentTime = Time.GetMs()
	if ((StartTime1 == nil) or (CurrentTime - StartTime1) >= 100) then
		StartTime1 = CurrentTime
		SendError()
	end

	-- Determine the how many times we want to blink the led
    if ((ERROR & 2) >> 1) == 1 then
        ErrorBlinkCounter = 2
    elseif ((ERROR & 4) >> 2) == 1 then
        ErrorBlinkCounter = 3
    end

    -- Start the blinking cycle if enough time has passed
	CurrentTime = Time.GetMs()
    if StartTime3 == nil or (CurrentTime - StartTime3) >= 3000 then
        StartTime3 = CurrentTime
        FlagCounter = 0
    end

    -- Handle the blinking logic
    if FlagCounter < 2 * ErrorBlinkCounter then
        if StartTime4 == nil or (CurrentTime - StartTime4) >= 200 then
            StartTime4 = CurrentTime
            FlagCounter = FlagCounter + 1

            -- Toggle LED
            if ledValue == 0 then
                CANopen.SetObjectValue(LED_ID, LED.ON)
            else
                CANopen.SetObjectValue(LED_ID, LED.OFF)
            end
        end
    end

    if ERROR == 0 then
		FlagCounter = 0
		CANopen.SetObjectValue(LED_ID, LED.OFF)
		Application.NextState = "Idle"
		return
	end
end


function GetMaxSpeed()
	if Digital.Get(DIRECTION_IN) == DIRECTION.FORWARD then
		return CANopen.GetObjectValue(FORWARD_MAX_SPEED_ID)
	end
	return CANopen.GetObjectValue(REVERSE_MAX_SPEED_ID)
end


function SendError()
	-- Send on ID + nodeID; we get the NodeId from CANopen off the inverter
	local CanID = 0x80 + CANopen.GetObjectValue({0x100B, 0x00})
	local byte0 = ERROR & 0xFF
	local byte1 = (ERROR & 0xFF00) >> 8
	local byte2 = ERROR_reg & 0xFF
	CAN.Send(CanID,{byte0, byte1, byte2, 0, 0, 0, 0, 0})
end

function SendWarnings()
	-- Send on PDO + nodeID;
	local CanID = 0x180 + CANopen.GetObjectValue({0x100B, 0x00})
	local byte0 = WARNINGS & 0xFF
	CAN.Send(CanID,{byte0, 0, 0, 0, 0, 0, 0, 0})
end


function OutOfBounds(throttleVoltage, minVal, maxVal)
    if (throttleVoltage < minVal) or (throttleVoltage > maxVal) then
        return true
    else
        return false
    end
end


--- Fuctino to negate bits
---@param value number Value to negate
---@param xBit number Number of bites e.g 16bit => xBit = 16
function Negate_Xbit(value, xBit)
    local negated = 0
    for i = 0, (xBit - 1) do
        if (value & (1 << i)) == 0 then
            negated = negated + (1 << i)
        end
    end
    return negated
end
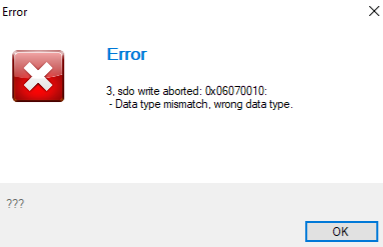
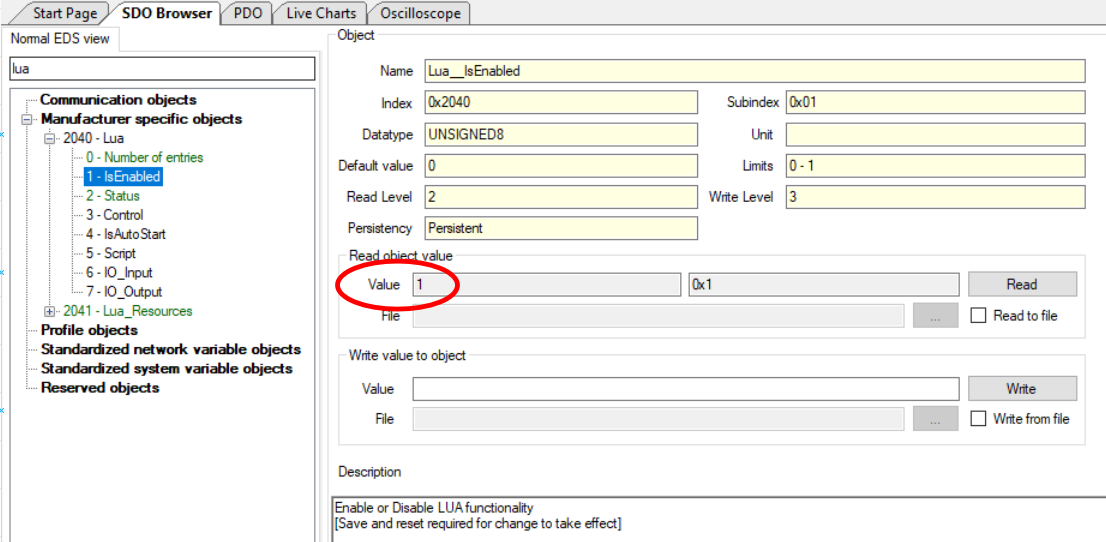
Error 0x06070010 when loading a script may indicate Lua object 0x2040 0x01 isn't set to 1. To resolve, ensure proper access level in Configurator to unlock this feature. If you do not have the proper access level contact us.
Best practices
For further insights and practical tips, I recommend exploring "Programming in Lua," available at: Programming in Lua. Authored by experts in the field, this comprehensive resource offers invaluable guidance for Lua developers. It's worth noting that the entire topic is accessible free of charge as of April 24, 2024. Additionally, some sections of the topic include examples to further illustrate key concepts and techniques.
Minimizing Global Variables
In Lua scripting, it's imperative to exercise caution with global variables to prevent memory exhaustion and script failures, especially on embbeded systems. Emphasizing the utilization of local variables whenever possible is paramount. By minimizing global variable usage, we mitigate the risk of memory overflow and enhance script performance.
Example:
myGlobalVaribale = 10 --Global variable
local myLocalVaribale = 10 --Local variable
Issues
If IO.Print() isn't functioning, it may signal an outdated firmware version. Firmware 0x10C01 lacks support, while 0x10D02 enables the function.

