# Lua Manual
**Disclaimer**
The EMSISO d.o.o. scripting functionality, based on the Lua programming language, is provided to enable flexibility and customization for motor control applications. However, EMSISO d.o.o. assumes no responsibility or liability for any damages, malfunctions, injuries, or losses resulting from the use of scripts provided by EMSISO d.o.o. or scripts created, modified, or executed by users.
Users are fully responsible for testing and verifying all scripts in a controlled and safe environment before deployment. Any script used in conjunction with EMSISO d.o.o. products is done at the user’s own risk.
By using the scripting feature, you acknowledge and agree to release EMSISO d.o.o. from all claims, demands, or liability for any incidents that may arise from its use.
## 1. General
### 1.1 Purpose
- This manual helps you create and run Lua scripts on emDrive.
- It also informs you about any warnings and known issues.
### 1.2 Scope
- The manual covers Lua scripting features, including how to:
- Download scripts
- Control scripts
- Debug scripts
- Use functions provided by the emDrive library
- It also lists known issues and limitations of the scripting functionality.
### 1.3 Important Note
- This manual assumes you already know Lua and emDrive Configurator software.
- It is valid for Lua version 5.4. For more details on Lua, visit:
- [Lua 5.4 Manual](https://www.lua.org/manual/5.4/)
- [Programming in Lua](https://www.lua.org/pil/contents.html)
## 2. emDrive library
### 2.1 General
The emDrive library is used instead of the standard Lua libraries. This library includes some functions that are identical to those in the standard Lua library, some that have been modified, and others that are unique to emDrive.
Do not overwrite the emDrive library functions and variables.
The emDrive library is organized into different sets, each focused on a specific group of functionalities. This section will describe these sets and their functions and variables in detail.
Here is an example of how to use a library function. This example will show a legend that explains how to read the prototypes of library functions. Words in blue represent variable types, such as arguments or return values. These types follow standard Lua conventions, with the addition of the "integer" type, which represents whole numbers.
When your script calls a function from the emDrive library, the arguments you provide must match the prototype exactly, including the type and, for tables, their structure. If they do not, an error will occur.
number | nil ret1, boolean ret2 = Namespace.FunctionName({integer arg1Field1, string arg1Field2} arg1,
{integer, integer, integer \[5:5-11\], integer \[13\]} arg2, \[, string arg3\], arg4…)
This is an example of a function named `Namespace.FunctionName`. It takes in: 2 fixed arguments, 1 optional
argument and a variable number of arguments. It also returns 2 values where the first can also be nil.
| ** **
| **Name**
| **Description**
|
| **Arguments**
| arg1
| Table with two named fields arg1Field1 of type integer and arg1Field2 of type string.
|
| arg2
| Table with unnamed fields with all integer types at index 1, 2, 5 with size 1 to 7 and 13.
|
| arg3
| Optional string argument.
|
| arg4
| Variable number of arguments of any type.
|
| **Returns**
| ret1
| First returned value which can be either a number type or nil.
|
| ret2
| Second returned value which is of boolean type.
|
Functions can be called with more arguments then expected in which case excess arguments are ignored.
The emDrive library can raise errors in addition to those raised by the Lua kernel, such as accessing nil values. These library errors usually occur when the type or value of an argument does not match what is expected.
For each function in the emDrive library, the possible errors (exceptions) and the conditions that cause them will be listed.
### 2.2 Functions
#### 2.2.1 Base
This library provides base script functionality that is not specific to any part of the emDrive hardware (HW) or firmware (FW).
Error(string message \[, integer level\])
The `Error` function raises an error with a custom message and specifies the level of the error position. It is useful for throwing exceptions, such as for debugging purposes. This function is equivalent to the standard `error()` function in Lua and never returns.
Table 1: Error() prototype description| ** **
| **Name**
| **Description**
|
| **Arguments**
| message
| Error message shown.
|
| level
| Specify how to get the error position:
· 0, error position is not added,
· 1 (default), the error position is where the error() function was called,
· 2 points the error to where the function that called error() was called,
· and so on…
|
Table 2: IO.Read() prototype description| ** **
| **Name**
| **Description**
|
| **Arguments**
| option
| How to interpret the input string:
· *‘n’* as a number,
· *‘l’* (default) as one line string without newline,
· *‘L’* as one line string with newline if exists,
· *‘a’* as string of all text,
· *0, 1, 2, … as number of characters.*
|
| **Returns**
| value
| Interpreted input.
|
Table 3: IO.Read() exceptions| **Exception**
|
| option is not an integer nor a string.
|
| option is a string longer than 1 character.
|
| option is a string but not one of the valid values.
|
\_\_\_\_\_\_\_\_\_\_\_\_\_\_\_\_\_\_\_\_\_\_\_\_\_\_\_\_\_\_\_\_\_\_\_\_\_\_\_\_\_\_\_\_\_\_\_\_\_\_\_\_\_\_\_\_\_\_\_\_\_\_\_\_\_\_\_\_\_\_\_\_\_\_\_\_\_\_\_\_\_\_\_\_\_\_\_\_\_\_\_\_\_\_\_\_\_\_\_\_\_\_\_\_\_\_\_\_\_\_\_\_\_\_\_\_\_\_\_\_\_\_\_\_\_\_\_\_\_\_\_\_\_\_\_\_\_\_\_
IO.Write(string text…)
You can write text to the output object using this function.
- **Behavior**:
- If the text is short enough, it is appended to the existing output string.
- If the text is too long, the existing output string is overwritten.
This function is equivalent to the standard `io.write()` function in Lua.
Table 4: IO.Write() prototype description| ** **
| **Name**
| **Description**
|
| **Arguments**
| text
| Text to write to output object.
|
Table 5: IO.Write() exceptions| **Exception**
|
| text is not a string.
|
Table 6: IO.Print() prototype description| ** **
| **Name**
| **Description**
|
| **Arguments**
| object
| Objects to convert to string and write to output object.
|
Table 7: Time.GetMs() prototype description| ** **
| **Name**
| **Description**
|
| **Returns**
| time
| Elapsed milliseconds since power on.
|
Table 8: Time.WaitMs() prototype description| ** **
| **Name**
| **Description**
|
| **Returns**
| time
| Milliseconds to wait.
|
Table 9: Time.WaitMs() exceptions| **Exception**
|
| time is negative or 0.
|
Table 10: Time.WaitMsUntil() prototype description| ** **
| **Name**
| **Description**
|
| **Arguments**
| startTime
| Time (milliseconds) from which waiting time is measured.
|
| waitTime
| Milliseconds to wait.
|
| **Returns**
| newStartTime
| Time (milliseconds) at which script was halted.
|
Table 11: Time.WaitMsUntil() exceptions| **Exception**
|
| startTime is negative or 0.
|
| waitTime is negative or 0.
|
**Note**: This library does not support CAN FD (Flexible Data-rate).
\_\_\_\_\_\_\_\_\_\_\_\_\_\_\_\_\_\_\_\_\_\_\_\_\_\_\_\_\_\_\_\_\_\_\_\_\_\_\_\_\_\_\_\_\_\_\_\_\_\_\_\_\_\_\_\_\_\_\_\_\_\_\_\_\_\_\_\_\_\_\_\_\_\_\_\_\_\_\_\_\_\_\_\_\_\_\_\_\_\_\_\_\_\_\_\_\_\_\_\_\_\_\_\_\_\_\_\_\_\_\_\_\_\_\_\_\_\_\_\_\_\_\_\_\_\_\_\_\_\_\_\_\_\_\_\_\_\_\_
This library supports two modes of operation for CAN communication. The mode is selected during the initialization of CAN.
Table 12: CAN modes of operation| **Mode**
| **Description**
|
| CAN\_RX\_TX
| CAN shall be used to send and receive messages (user is required to implement CAN.Received(message) function).
|
| CAN\_TX\_ONLY
| CAN shall be used only to send messages.
|
Table 13: CAN.Initialize() prototype description| ** **
| **Name**
| **Description**
|
| **Arguments**
| mode
| CAN mode of operation (see Table 12).
|
| useExtendedFrame
| Will extended frames be transferred?
|
| rxID
| Frame ID to receive.
|
| rxIDMask
| Receive filter ID mask.
|
Table 14: CAN.Initialize() exceptions| **Exception**
|
| mode is not one of the valid values.
|
| useExtendedFrame is not boolean.
|
| rxID is not an integer.
|
| mode is set to CAN\_RX\_TX and rxIDMask is not an integer.
|
| CAN initialization failed (should never happen).
|
Table 15: CAN.Send() prototype description| ** **
| **Name**
| **Description**
|
| **Arguments**
| id
| Sent frame ID.
|
| data
| 1 to 8 bytes of data.
|
Table 16: CAN.Send() exceptions| **Exception**
|
| id is not an integer.
|
| data is not a table.
|
| Length of data is more than 8.
|
| Value of data is not an integer.
|
| Value of data is more than 0xFF.
|
| CAN send failed (should never happen).
|
Table 17: CAN.Received() prototype description| ** **
| **Name**
| **Description**
|
| **Arguments**
| message
| Received message.
|
Table 18: CANopen NMT states| **NMT state**
| **Description**
|
| CO\_UNKNOWN
| NMT in unknown state (unreachable).
This state cannot be set by user.
|
| CO\_OPERATIONAL
| Device can use all supported communication objects.
This state can be set by user.
|
| CO\_STOPPED
| Device operation is stopped.
This state cannot be set by user.
|
| CO\_PREOPERATIONAL
| First state after initialization indicating that device is ready to work. Limited message transfer support.
This state can be set by user.
|
| CO\_RESET\_NODE
| Application reset. Application objects set to their power-on or default values.
This state cannot be set by user.
|
| CO\_RESET\_COMM
| Communication reset. Communication objects are set to their power-on or default values.
This state cannot be set by user.
|
Table 19: CANopen.GetNMTState() prototype description
| **Name**
| **Description**
|
| **Arguments**
| state
| Currently set NMT state (see Table 18).
|
Table 20: CANopen.SetNMTState() prototype description| ** **
| **Name**
| **Description**
|
| **Arguments**
| state
| Next NMT state (see Table 18).
|
Table 21: CANopen.SetNMTState() exceptions| **Exception**
|
| state is not one of the valid values.
|
Table 22: CANopen.GetObjectValue() prototype description| ** **
| **Name**
| **Description**
|
| **Arguments**
| object
| CANopen object.
|
| **Returns**
| value
| Object value.
|
Table 23: CANopen.GetObjectValue() exceptions| **Exception**
|
| object is not a table.
|
| Length of object is not 2.
|
| Value at first index of object is not an integer.
|
| Value at second index of object is not an integer.
|
| Invalid object index and/or subindex.
|
Table 24: CANopen.SetObjectValue() prototype description| ** **
| **Name**
| **Description**
|
| **Arguments**
| object
| CANopen object.
|
| value
| Object value.
|
Table 25: CANopen.SetObjectValue() exceptions| **Exception**
|
| object is not a table.
|
| Length of object is not 2.
|
| Value at first index of object is not an integer.
|
| Value at second index of object is not an integer.
|
| Invalid object index and/or subindex.
|
| Value is not a number
|
Table 26: Motor control modes| **Motor control mode**
| **Description**
|
| TORQUE\_MODE
| Motor is torque controlled.
Set requested torque with Motor.SetReferenceTorque().
|
| VELOCITY\_MODE
| Motor is velocity controlled.
Set requested velocity with Motor.SetReferenceVelocity().
|
| POSITION\_MODE
| Motor is position controlled.
Set requested torque with Motor.SetReferencePosition().
|
Table 27: Motor control states| **Motor control state**
| **Description**
|
| MOTOR\_UNDEFINED
| Motor control in undefined state (internal error).
|
| MOTOR\_INITIALIZATION
| Motor control is initializing.
|
| MOTOR\_SELF\_TEST
| Motor control is performing start-up self-tests.
|
| MOTOR\_OFF
| Motor control is initialized and disabled. Controlling the motor is not possible. Reference values have no effect.
|
| MOTOR\_ON
| Motor control is initialized and enabled. Motor is controlled according to mode and reference value such that the operating conditions are always within defined limits.
|
| MOTOR\_ERROR
| Motor control detected an error and was disabled. This state can be entered in multiple ways: limits overreached, failed calibration and other.
|
| MOTOR\_CALIBRATION
| Motor control is being calibrated. In this state characteristics of the motor and angle sensor are being measured.
|
**Note**: This function is only applicable when the motor control is in an error state.
\_\_\_\_\_\_\_\_\_\_\_\_\_\_\_\_\_\_\_\_\_\_\_\_\_\_\_\_\_\_\_\_\_\_\_\_\_\_\_\_\_\_\_\_\_\_\_\_\_\_\_\_\_\_\_\_\_\_\_\_\_\_\_\_\_\_\_\_\_\_\_\_\_\_\_\_\_\_\_\_\_\_\_\_\_\_\_\_\_\_\_\_\_\_\_\_\_\_\_\_\_\_\_\_\_\_\_\_\_\_\_\_\_\_\_\_\_\_\_\_\_\_\_\_\_\_\_\_\_\_\_\_\_\_\_\_\_\_\_
Motor.SetControlMode(mode)
Use this function to set the motor control mode.
Table 28: Motor.SetControlMode() prototype description| ** **
| **Name**
| **Description**
|
| **Arguments**
| mode
| Motor control mode (see Table 26).
|
Table 29: Motor.SetControlMode() exceptions| **Exception**
|
| mode is not one of the valid values.
|
Table 30: Motor.GetState() prototype description| ** **
| **Name**
| **Description**
|
| **Returns**
| state
| Motor control state (see Table 27).
|
Table 31: Motor.GetWarnings()| ** **
| **Name**
| **Description**
|
| **Returns**
| warnings
| Active warnings.
Refer to emDrive manual or related CANopen object for value meaning.
|
Table 32: Motor.GetProtectionsLow()| ** **
| **Name**
| **Description**
|
| **Returns**
| protectionsLow
| Active protections (first 32bits).
Refer to emDrive manual or related CANopen object for value meaning.
|
\_\_\_\_\_\_\_\_\_\_\_\_\_\_\_\_\_\_\_\_\_\_\_\_\_\_\_\_\_\_\_\_\_\_\_\_\_\_\_\_\_\_\_\_\_\_\_\_\_\_\_\_\_\_\_\_\_\_\_\_\_\_\_\_\_\_\_\_\_\_\_\_\_\_\_\_\_\_\_\_\_\_\_\_\_\_\_\_\_\_\_\_\_\_\_\_\_\_\_\_\_\_\_\_\_\_\_\_\_\_\_\_\_\_\_\_\_\_\_\_\_\_\_\_\_\_\_\_\_\_\_\_\_\_\_\_\_\_\_
integer protectionsHigh = Motor.GetProtectionsHigh()
Retrieve the currently active motor control protections (last 32 bits).
Table 33: Motor.GetProtectionsHigh()| ** **
| **Name**
| **Description**
|
| **Returns**
| protectionsHigh
| Active protections (second 32 bits - currently empty meant for future FW releases).
Refer to emDrive manual or related CANopen object for value meaning.
|
\_\_\_\_\_\_\_\_\_\_\_\_\_\_\_\_\_\_\_\_\_\_\_\_\_\_\_\_\_\_\_\_\_\_\_\_\_\_\_\_\_\_\_\_\_\_\_\_\_\_\_\_\_\_\_\_\_\_\_\_\_\_\_\_\_\_\_\_\_\_\_\_\_\_\_\_\_\_\_\_\_\_\_\_\_\_\_\_\_\_\_\_\_\_\_\_\_\_\_\_\_\_\_\_\_\_\_\_\_\_\_\_\_\_\_\_\_\_\_\_\_\_\_\_\_\_\_\_\_\_\_\_\_\_\_\_\_\_\_
number velocity = Motor.GetReferenceVelocity()
Retrieve the currently set reference velocity.
Table 34: Motor.GetReferenceVelocity()| ** **
| **Name**
| **Description**
|
| **Returns**
| velocity
| Velocity \[RPM\].
|
Table 35: Motor.SetReferenceVelocity() prototype description| ** **
| **Name**
| **Description**
|
| **Arguments**
| velocity
| Velocity \[RPM\].
|
Table 34: Motor.SetReferenceVelocity() exceptions| **Exception**
|
| velocity is not a number.
|
Table 36: Motor.GetReferenceTorque() prototype description| ** **
| **Name**
| **Description**
|
| **Returns**
| torque
| Torque \[Nm\].
|
Table 37: Motor.SetReferenceTorque() prototype description| ** **
| **Name**
| **Description**
|
| **Arguments**
| torque
| Torque \[Nm\].
|
Table 38: Motor.SetReferenceTorque() exceptions| **Exception**
|
| torque is not a number.
|
Table 39: Motor.GetReferencePosition() prototype description| ** **
| **Name**
| **Description**
|
| **Returns**
| position
| Position \[°\].
|
Table 40: Motor.SetReferencePosition() prototype description| ** **
| **Name**
| **Description**
|
| **Arguments**
| position
| Position \[°C\].
|
Table 41: Motor.SetReferencePosition() exceptions| **Exception**
|
| position is not a number.
|
Table 42: Motor.GetVelocity() prototype description| ** **
| **Name**
| **Description**
|
| **Returns**
| velocity
| Velocity \[RPM\].
|
Table 43: Motor.GetTorque() prototype description| ** **
| **Name**
| **Description**
|
| **Returns**
| torque
| Torque \[Nm\].
|
Table 44: Motor.GetPosition() prototype description| ** **
| **Name**
| **Description**
|
| **Returns**
| position
| Position \[°C\].
|
Table 45: Motor.TriggerProtection() prototype description| ** **
| **Name**
| **Description**
|
| **Arguments**
| ErrorCode
| Create custom value for error code |
| **
**
| ErrorMessage
| Custom error description |
Table 45: Motor.TriggerProtection() exceptions| **Exception**
|
| ErrorCode is not a number
ErrorMessage is not a string or empty - Must be defined
|
Table 45: Digital ports| **Digital port**
| **Description**
|
| LOW\_SIDE\_1
| Low-side switch 1.
|
| LOW\_SIDE\_2
| Low-side switch 2.
|
| LOW\_SIDE\_3
| Low-side switch 3.
|
| LOW\_SIDE\_4
| Low-side switch 4.
|
| HIGH\_SIDE\_1
| High-side switch 1.
|
| DIGITAL\_IN\_1
| Digital input 1.
This port is read-only.
|
| DIGITAL\_IN\_2
| Digital input 2.
This port is read-only.
|
| DIGITAL\_IN\_3
| Digital input 3.
This port is read-only.
|
| DIGITAL\_IN\_4
| Digital input 4.
This port is read-only.
|
| DIGITAL\_IN\_5
| Digital input 5.
This port is read-only.
|
| DIGITAL\_IN\_6
| Digital input 6.
This port is read-only.
|
| DIGITAL\_IN\_7
| Digital input 7.
This port is read-only.
|
Table 46: Digital.Get() prototype description| ** **
| **Name**
| **Description**
|
| **Arguments**
| port
| Digital port (see Table 44).
|
| **Returns**
| state
| Value of 0 – 1 representing signal’s duty cycle.
|
Table 47: Digital.Get() exceptions| **Exception**
|
| port is not one of the valid values.
|
Table 48: Digital.Set() prototype description| ** **
| **Name**
| **Description**
|
| **Arguments**
| port
| Digital port (see Table 44).
|
| state
| Value of 0 – 1 representing signal’s duty cycle.
|
Table 49: Digital.Set() exceptions| **Exception**
|
| port is not one of the valid values.
|
| state is not a number between 0 and 1.
|
Table 50: Analog ports| **Analog port**
| **Description**
|
| ANALOG\_IN\_1
| Analog input 1.
|
| ANALOG\_IN\_2
| Analog input 2.
|
| ANALOG\_IN\_3
| Analog input 3.
|
| ANALOG\_IN\_4
| Analog input 4.
|
| LOW\_SIDE\_1\_VOLTAGE
| Low-side switch 1 voltage measurement.
|
| LOW\_SIDE\_1\_CURRENT
| Low-side switch 1 current measurement.
|
| LOW\_SIDE\_2\_VOLTAGE
| Low-side switch 2 voltage measurement.
|
| LOW\_SIDE\_3\_VOLTAGE
| Low-side switch 3 voltage measurement.
|
| LOW\_SIDE\_4\_VOLTAGE
| Low-side switch 4 voltage measurement.
|
| HIGH\_SIDE\_1\_VOLTAGE
| High-side switch 1 voltage measurement.
|
| DIGITAL\_IN\_1
| Digital input 1.
|
| DIGITAL\_IN\_2
| Digital input 2.
|
| DIGITAL\_IN\_3
| Digital input 3.
|
| DIGITAL\_IN\_4
| Digital input 4.
|
| DIGITAL\_IN\_5
| Digital input 5.
|
| DIGITAL\_IN\_6
| Digital input 6.
|
| DIGITAL\_IN\_7
| Digital input 7.
|
Table 51: Analog.Get() prototype description| ** **
| **Name**
| **Description**
|
| **Arguments**
| port
| Analog port (see Table 49).
|
| **Returns**
| value
| Analog value.
|
Table 52: Analog.Get() exceptions| **Exception**
|
| port is not one of the valid values.
|
**Note:** Only the content of the script is transferred, not the file name.
**Limitation:** You can store only one script at a time on the emDrive.
#### 3.2.2 Structure
##### Initialization Routine
- **Function Requirement:** Your script must include a function named `Initialize()`.
- **Execution:** This function is the first to run when the script is executed and runs only once.
- **Purpose:** Use this function to initialize hardware and firmware, such as:
- Setting up CAN
- Enabling the motor
- Setting outputs
- Setting global variables
##### Loop Routine
- **Function Requirement:** Your script must include a function named `Loop()`.
- **Periodic Execution:** This function runs periodically based on the `LoopPeriodMs` variable, which represents the period in milliseconds.
- **Setting the Period:** `LoopPeriodMs` can be set globally or within the `Initialize()` function.
- **Purpose:** Use the `Loop()` function for tasks that need regular updates, such as:
- Setting motor velocity
- Parsing CAN frames
- Reading inputs and setting output ports
####
**Minimum Loop Period:** The minimum allowed loop period is 10 milliseconds.
**Execution Time:** Ensure the `Loop()` function completes within the set period to maintain deterministic execution. If the loop takes longer, it can cause unpredictable behavior.
**Priority Consideration:** The firmware on the emDrive has higher priority than the script, which means script execution may be interrupted by higher priority tasks.
Use the resource monitor (see the Resource Monitor section) to measure loop duration and determine the minimum possible loop period.
The resource monitor can also show the maximum loop duration when interrupted by higher priority tasks.
**Data Transfer:** Transferring large data over CAN/CANopen will completely block script execution.
### 3.3 Executing script
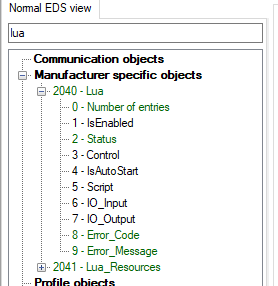
After you've created your script, it is time to download it to emDrive and execute it. For these purposes, a few CANopen objects are provided, as seen in Figure 3. They are grouped together and are accessible at index 0x2040.
[](https://help.emsiso.com/uploads/images/gallery/2025-04/zKCimage.png)
Table 52 provides a short description of objects related to script execution. More detailed meanings and use cases will be presented in the following sections.
Table 53: Script execution objects description| **Name**
| **Description**
|
| IsEnabled
| Defines if Lua feature is enabled on particular emDrive:
0: Lua feature disabled
1: Lua feature enabled
|
| Status
| Lua status:
0: File is non-existent or corrupted,
1: Compilation failed (see Output),
2: Execution failed (see Output),
3: Downloaded file is valid,
4: Script execution is paused,
5: Script is executing,
6: Script timed out and was stopped.
|
| Control
| Lua script control:
0: Do nothing,
1: Pause,
2: Run,
3: Restart.
|
| IsAutoStart
| Should script be started automatically after device powers on?
|
| Script
| Download or upload Lua script.
|
| IO\_Input
| Script input object. This object can be used to pass values/arguments to the script during runtime.
|
| IO\_Output
| Script output object. This object is used to display error messages and can be used by script to print arbitrary text messages.
|
| Error\_Code
| Used to show the value of error raised inside lua script. If this object is not 0, the inverter will go into error state.
|
| Error\_Message
| Used to show the appropriate error description for the specific error code.
|
1. **Pause (Control = 1)**: This will halt the currently executing script until Run or Restart is set. It will not stop the motor, disable outputs, or otherwise modify the state of the emDrive from what was last set by the script. This has no effect if the script is not executing.
2. **Run (Control = 2)**: This will resume execution of a paused script from where it was left off. If the script is not executing nor paused but is downloaded and verified, it will start executing the downloaded script. This has no effect if the script is already executing.
3. **Restart (Control = 3)**: This will terminate the currently executing or paused script, recompile, and restart it. If the script is not executing nor paused but is downloaded and verified, it will start executing the downloaded script.
**NOTE**: The script is executed only after motor control has been initialized, which may delay script execution after the device powers on (usually by approximately 100 ms, although this value may vary).
#### 3.3.3 Errors
When an error with the script is detected, the Status object (0x2040, 0x2) is set to a value signaling the type of error. There are four distinct types of errors that are detectable at different stages of script execution:
1. **File is non-existent or corrupted (Status = 0)**: This is set when the script is not stored on the emDrive, or the stored script is corrupted. This error is triggered when script verification fails, either when the device powers on or whenever a new script is downloaded.
2. **Compilation failed (Status = 1)**: This is set when the script could not be compiled, which could be caused by syntax errors or running out of memory. This error is triggered every time script compilation fails, such as when the script is restarted, executed for the first time, or downloaded while another script is already executing, causing the new script to be automatically compiled after downloading.
3. **Execution failed (Status = 2)**: This is set when an error occurs during runtime—such as in initialization, loop, or other required routines—caused by several reasons like accessing nil objects, passing invalid values, missing functions, running out of memory, and others. This error is also raised if the `Error()` function is called from within the script.
4. **Script timed out and was stopped (Status = 6)**: This is set when the initialization, loop, or other required routines take longer to execute than expected.
The initialization routine must execute within 100 ms, while the loop and other routines are required to execute within 2 × `LoopPeriodMs`.
Further details of what went wrong with the script can be retrieved from the output object.
All the above-mentioned errors are permanent. When an error is raised, emDrive protection is activated, and emDrive enters an error state from which it cannot recover (refer to the emDrive manual for more details about protections and error states). At this point, the script should be corrected for errors, downloaded to the emDrive, and then the device should be reset to clear the error.
#### 3.3.4 Debugging
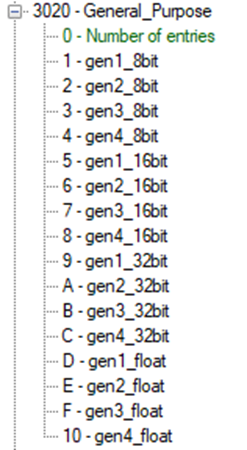
There is no proper debugging mechanism in place; however, utilizing Lua I/O objects and general-purpose CANopen objects, some form of limited debugging is possible. Using the input object, the user can control the flow of the program. The user can also write debug information to the output object. Additionally, all objects at index 0x3020, can be used freely for debugging purposes.
#### 3.3.5 Resource monitor
The resource monitor is used to measure characteristics of the script during compile-time, initialization, and runtime (loop). All available objects relevant to resource monitoring are shown under object 0x2031 and described in Table 53.
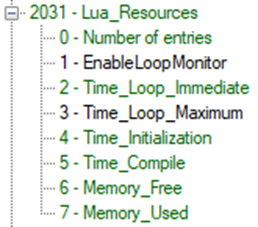
Table 54: Script resource monitor objects description| **Name**
| **Description**
|
| EnableLoopMonitor
| Enable loop resource monitoring which includes execution time and RAM usage.
|
| Time\_Loop\_Immediate
| Immediate measured loop duration \[us\].
|
| Time\_Loop\_Maximum
| Maximum measured loop duration \[us\].
This value might sometimes appear unreasonably large that is when task running Lua script gets interrupted by higher priority tasks.
Write 0 to clear value and prepare it for new measurement.
|
| Time\_Initialization
| Time \[ms\] required to execute initialization routine.
|
| Time\_Compile
| Time \[ms\] required to load the script - that is time to script initialization.
|
| Memory\_Free
| Immediately available RAM \[byte\].
|
| Memory\_Used
| Immediately used RAM \[byte\].
|
Initialization and compile-time measurements are performed every time a new script is downloaded and executed or when an existing script is restarted. Memory and loop time monitoring must be explicitly enabled by setting `EnableLoopMonitor` to 1. This is because these measurements are calculated every loop, thereby shortening the processing time allocated to the script.
### 3.4 Using the emdrive Library
#### 3.4.1 Option 1: Automatic Setup
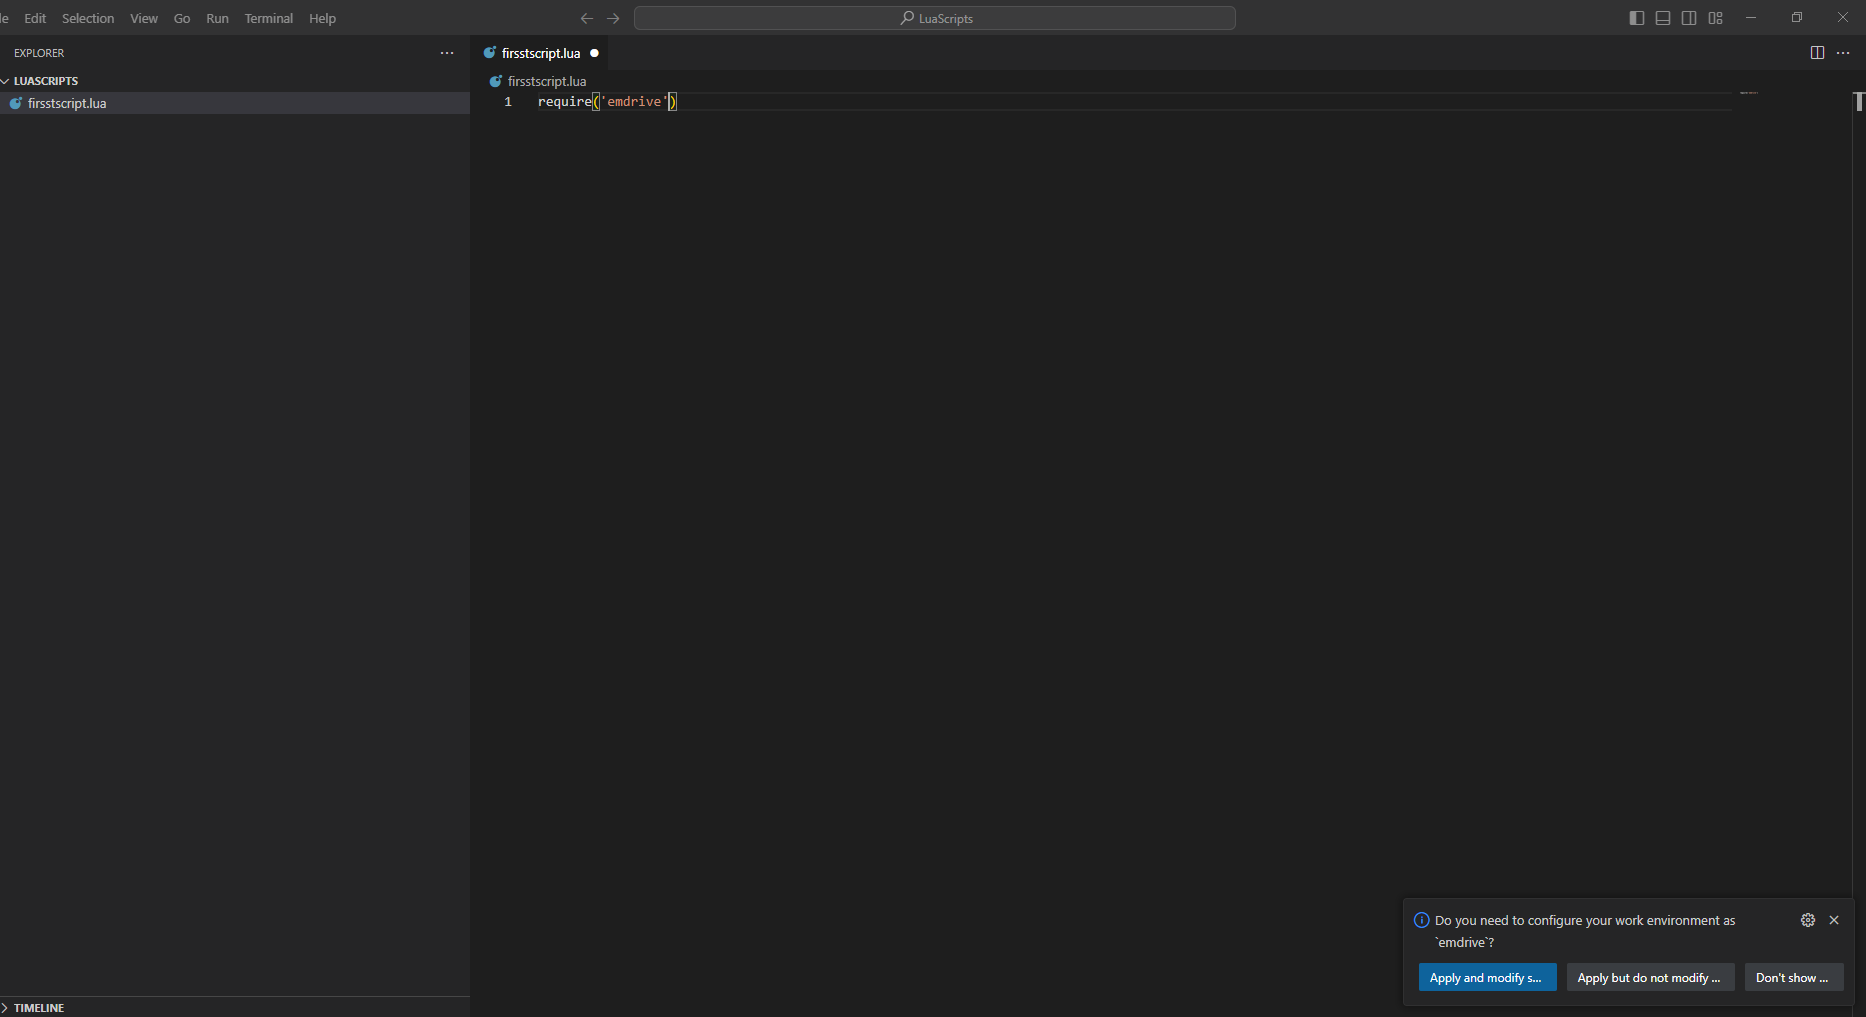
1. **Add Code to Script**
- In `firstscript.lua`, add the following line:
```lua
require('emdrive')
```
2. **Apply Path Modification**
- A pop-up window will appear in the bottom right corner. Click "Apply and modify."
- After applying, delete the `require('emdrive')` line.
[](http://help.emsiso.com/uploads/images/gallery/2024-07/NgCimage.png)
3. **Check .vscode Folder**
- A new folder named `.vscode` will be created.
- Inside, there will be a `settings.json` file containing the path to the library.
#### 3.4.2 Option 2: Manual Setup
1. **Create .vscode Folder**
- Manually create a `.vscode` folder in your workspace.
2. **Create settings.json File**
- Inside the `.vscode` folder, create a `settings.json` file.
3. **Add Library Path to settings.json**
- Add the following code to `settings.json`: ```json
{
"lua.workspace.library": [
"D:/LuaLibraries"
]
}
```
## 4. Examples
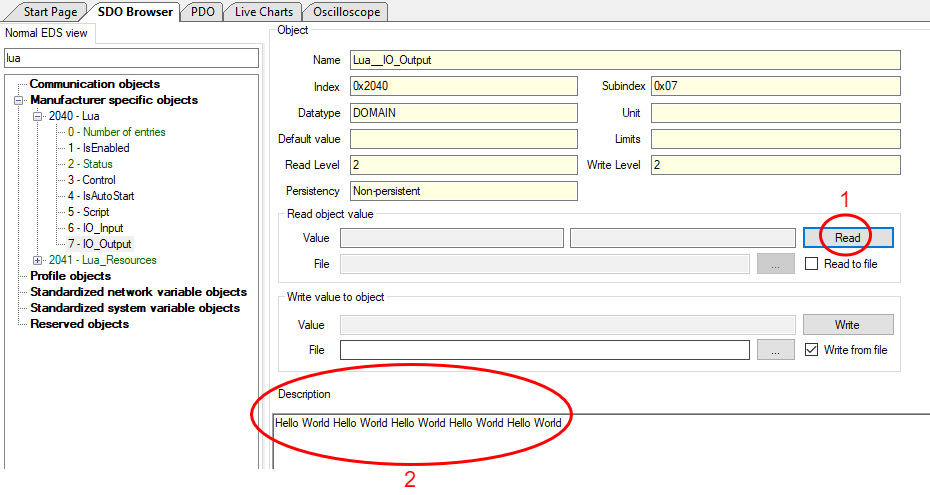
### 4.1 Example 1: "Hello World"
Description:
Print "Hello World" every 100ms to IO\_Output.
To make the script work, you need to have two functions: `Initialize` and `Loop`.
1. **Copy the Code**
Copy the following code to an `example.lua` file:
```lua
function Initialize()
LoopPeriodMs = 100
end
function Loop()
IO.Write("Hello World ")
end
```
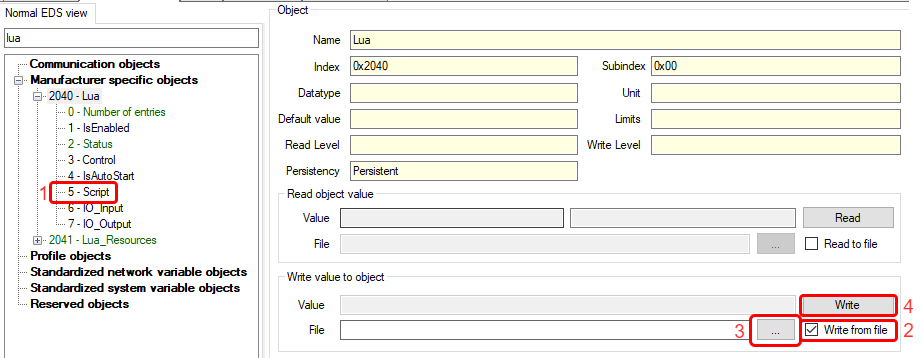
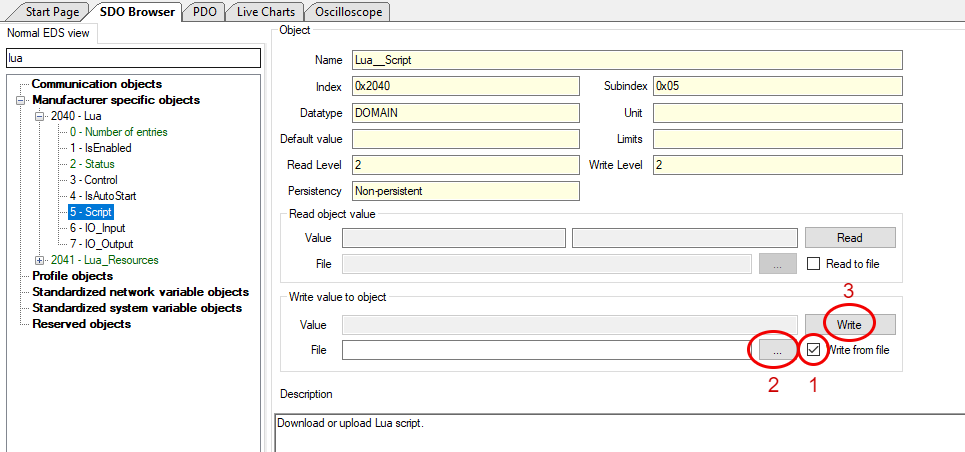
2. **Load the Script on the Inverter**
- Go to `0x2040 0x05 - Script`.
- Select "Write from file" and click "...".
- A pop-up window will appear. Locate the saved script and click "Open".
- Click "Write".
Global variables and tables use a lot of memory, especially in embedded systems. To save memory, it's best to use local variables whenever possible.
If you use a global variable at the start of your code and don't need it later, clear the global variable to free up memory. You can do this by adding the following code:
```lua
myGlobalVariable = nil
```
### 4.3 Example 3: Inputs/Outputs
#### 4.3.1 Example 3.1: Use of digital inputs & outputs
Turn low side 1 - ON when switch on digital pin 1 is switched ON.
```lua
function Initialize()
LoopPeriodMs = 10
end
function Loop()
local switch = Digital.Get(DIGITAL_IN_1)
if switch == 1 then
Digital.Set(LOW_SIDE_1, 1)
else
Digital.Set(LOW_SIDE_1, 0)
end
end
```
#### 4.3.2 Example 3.2: Use of analog inputs
Print analog value of analog input 1 when switch on digital pin 1 is switched ON.
```lua
function Initialize()
LoopPeriodMs = 10
end
function Loop()
local switch = Digital.Get(DIGITAL_IN_1)
if switch == 1 then
local rawVal = Analog.Get(ANALOG_IN_1)
IO.Print(rawVal)
end
end
```
### 4.4 Example 4: Blink LED
#### 4.4.1 Example 4.1: Blink LED - "delay"
Loop period is set to 1000ms
LED is connected on low side 1.
Blink LED every 0.5s with Time.WaitMs().
```lua
function Initialize()
LoopPeriodMs = 1000
end
function Loop()
local ledState = Digital.Get(LOW_SIDE_1)
if(ledState == 0) then
Digital.Set(LOW_SIDE_1, 1)
else
Digital.Set(LOW_SIDE_1, 0)
end
Time.WaitMs(500)
end
```
If we set the LoopPeriodMs to 100ms, the script stops running and shows a status of "6", meaning "Script timed out and was stopped."
Here are the key points to understand:
- **Time.WaitMs() Function**: This function pauses the script for a specified time. In our example, it pauses for 0.5 seconds.
- **LoopPeriodMs Setting**: We set the script to loop every 100ms.
- **Error Explanation**: Since the script must loop every 100ms but pauses for 0.5 seconds, it causes an error.
**Important Note**: Be very careful when using the Time.WaitMs() function to avoid such errors.
#### 4.4.2 Example 4.2: Blink LED - using loop time
We want the LED to blink every 0.5 seconds, while the main loop runs every 10ms. Here's how we do it:
1. **Count Loops**: We count each loop from 1 to 50.
2. **Multiply Counter**: Multiply the counter by the loop period (10ms).
3. **Check Reminder**: Divide the result by 500.
4. **Toggle Output**: If the remainder is 0, we toggle the LED.
If the analog throttle is damaged (either a short circuit or a broken circuit), there is no safety system in place. Here’s what can happen:
If the circuit is broken, no voltage will be applied, and the RPM will be 0.
If there is a short circuit, the inverter will receive the full 5V on the analog input, causing the RPM to go to the maximum.
To prevent these issues, we need to add safety features. These will be demonstrated in Example 8.
```lua
VelocityRef = {0x3010, 0x05}
function Initialize()
LoopPeriodMs = 10
end
function Loop()
local rpm = Analog.Get(ANALOG_IN_1) * 40
rpm = math.min(rpm,200)
CANopen.SetObjectValue(VelocityRef, rpm)
local VelRef_from_CANopen = CANopen.GetObjectValue(VelocityRef)
IO.Print(VelRef_from_CANopen)
end
```
### 4.8 Example 8: Demo application
#### 4.8.1 Example 8.1 : Demo application using CANopen objects.
In this example, we will demonstrate how to use the HW AIN1 input for a simple throttle control with a potentiometer (0-5V).
- **Throttle Input: HW AIN1 (0-5V Potentiometer)**
- Minimum RPM: 0 (corresponds to 0.5V)
- Maximum RPM: 200 (corresponds to 4.5V)
- Motor Stop Conditions:
- If the throttle voltage is below 0.2V or above 4.8V, the motor will stop to protect against short and break issues.
- PWM Enable Condition:
- If the throttle voltage is below 0.5V, the PWM signals will be enabled
```lua
function Initialize()
CANopen.SetObjectValue(VelocityRef, 0) -- Set Velocity ref to 0
CANopen.SetObjectValue(ControlMode, 1) -- Set velocity mode
CANopen.SetNMTState(CO_OPERATIONAL) -- Go into operational mode
LoopPeriodMs = 100
end
function Loop()
local throttleVoltage = Analog.Get(ANALOG_IN_1)
-- Decide whether to enable or disable the motor
if Digital.Get(DIGITAL_IN_1) == 1 then
-- only enable if voltage on 0.2 < ANALOG_IN_1 < 0.5 V so the motor does not start ang goes to high RPM
if (0.2 < throttleVoltage and throttleVoltage < 0.5) then
CANopen.SetObjectValue(PwmControl, 1)
end
else
CANopen.SetObjectValue(PwmControl, 0)
end
if (throttleVoltage > 0.2 and throttleVoltage < 4.8) == true then
-- Map values 0.5 - 4.5 V to 0 - 200 RPM and
local rpm = (throttleVoltage - 0.5) / 4 * 200
rpm = math.min(rpm, 200)
rpm = math.max(rpm, 0)
CANopen.SetObjectValue(VelocityRef, rpm)
else
CANopen.SetObjectValue(VelocityRef, 0)
CANopen.SetObjectValue(PwmControl, 0)
end
end
```
#### 4.8.2 Example 8.2 : Demo application using dedicated motor library.
In this example we will have the same functionality of the code as in example 8.1. but with the use of motor library
With the use of the motor library the code is easier to read and write than example 8.1.
```lua
function Initialize()
Motor.SetReferenceVelocity(0) -- Set Velocity ref to 0
Motor.SetControlMode(VELOCITY_MODE) -- Set velocity mode
CANopen.SetNMTState(CO_OPERATIONAL) -- Go into operational mode
LoopPeriodMs = 100
end
function Loop()
local throttleVoltage = Analog.Get(ANALOG_IN_1)
-- Decide whether to enable or disable the motor
if Digital.Get(DIGITAL_IN_1) == 1 then
-- only enable if voltage on 0.2 < ANALOG_IN_1 < 0.5 V so the motor does not start ang goes to high RPM
if (0.2 < throttleVoltage and throttleVoltage < 0.5) then
Motor.Enable()
end
else
Motor.Disable()
end
if (throttleVoltage > 0.2 and throttleVoltage < 4.8) == true then
-- Map values 0.5 - 4.5 V to 0 - 200 RPM and
local rpm = (throttleVoltage - 0.5) / 4 * 200
rpm = math.min(rpm, 200)
rpm = math.max(rpm, 0)
Motor.SetReferenceVelocity(rpm)
else
Motor.SetReferenceVelocity(0)
Motor.Disable()
end
end
```
### 4.9 Example 9: Throttle script (state - machine)
##### Throttle Control
- **Adjusting the Throttle:** Use the potentiometer connected to Analog\_IN\_1.
- **Protection:** The potentiometer is protected against short and break circuits.
- **Deadband:** A deadband of 0.3V is set for the potentiometer.
- **Speed Limits (needs to be set in objects described below):**
- Minimum speed: 0 RPM
- Maximum speed: 300 RPM
##### Motor Operation
- **Activation:**
- The motor runs only when digital pin 1 (ON/OFF switch) is connected.
- Change motor direction using a switch on digital pin 3.
- **Speed Setting:**
- Forward max speed: Object 0x3020 0x0D
- Reverse max speed: Object 0x3020 0x0E
- Switching direction at max speed changes to the corresponding reverse speed.
##### LED Diagnostics
- **LED Indicator (HS1):**
- **On:** System working normally.
- **Blinking:** System in error mode.
- **Error Blink Codes:**
- **Error 2:** Blinks twice, then pauses.
- **Error 3:** Blinks three times, then pauses.
##### Voltage and RPM Details
- **Working Voltage Range:**
- Minimum RPM: at 0.5V
- Maximum RPM: at 4.5V
- Deadband: 0.3V
- **Error Conditions:**
- **ERROR1:** Voltage out of bounds
- **ERROR2:** Analog\_IN\_1 < (Min\_Volt - Deadband)
- **ERROR3:** Analog\_IN\_1 > (Max\_Volt + Deadband)
##### CANopen Error Messages
- **Error Message (0x80 + nodeID):**
- Sent every 100ms in error state.
- Data length: 8 bytes.
- **Byte 0 Mapping:**
- Bit 0: Throttle potentiometer error out of bounds
- Bit 1: Throttle potentiometer break circuit error
- Bit 2: Throttle potentiometer short circuit error
- **Warning Message (0x180 + nodeID):**
- Sent every 100ms in start state.
- Data length: 8 bytes.
- **Byte 0:** Warning code 0x01 (Motor disabled, potentiometer not in min position)
If the motor spins at Forward max speed and you switch the direction with the switch then it will spin at Reverse max speed
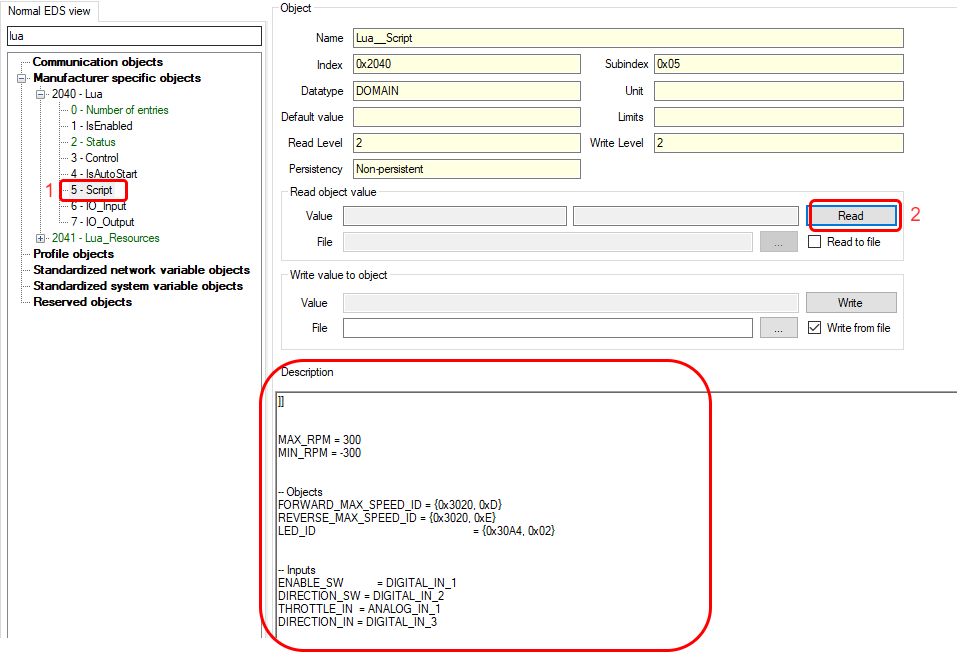
```lua
-- Limits
MAX_RPM = 300
MIN_RPM = -300
-- Objects
FORWARD_MAX_SPEED_ID = {0x3020, 0xD}
REVERSE_MAX_SPEED_ID = {0x3020, 0xE}
LED_ID = {0x30A4, 0x02}
-- Inputs
ENABLE_SW = DIGITAL_IN_1
DIRECTION_SW = DIGITAL_IN_2
THROTTLE_IN = ANALOG_IN_1
DIRECTION_IN = DIGITAL_IN_3
-- Voltage thresholds
THROTTLE_MIN_V = 0.5
THROTTLE_MAX_V = 4.5
DEADBAND = 0.3
ERROR = 0
ERROR_reg = 0
WARNINGS = 0
StartTime1 = nil
StartTIme2 = nil
StartTime3 = nil
StartTime4 = nil
FlagCounter = 0
DIN = {ON = 1, OFF = 0}
LED = {OFF = 0x0, ON = 0x1}
DIRECTION = {FORWARD = 1, REVERSE = 0}
-- Application FSM
Application = {}
function Initialize()
CAN.Initialize(CAN_TX_ONLY,false,0,0)
Application.NextState = "Idle"
Motor.SetReferenceVelocity(0)
Motor.SetControlMode(VELOCITY_MODE)
LoopPeriodMs = 10
end
function Loop()
Application[Application.NextState]()
end
Application.Idle = function ()
CANopen.SetObjectValue(LED_ID, LED.ON)
CANopen.SetNMTState(CO_OPERATIONAL)
Application.NextState = "Start"
end
Application.Start = function ()
-- IF enable switch is off go to stop state
if (Digital.Get(ENABLE_SW) == DIN.OFF ) then
Application.NextState = "Stop"
return
end
-- Get voltage
local throttleVoltage = Analog.Get(THROTTLE_IN)
-- Go into error state if throttle voltage is out of bounds
if OutOfBounds(throttleVoltage, (THROTTLE_MIN_V - DEADBAND), (THROTTLE_MAX_V + DEADBAND)) == true then
ERROR = (ERROR or 0) | 1
Application.NextState = "Error"
return
end
-- Check that voltage is bellow minimal throttle voltage - so that the motor does not start at high speed
if Motor.GetState() == MOTOR_OFF then
if throttleVoltage < (THROTTLE_MIN_V) then
Motor.Enable()
WARNINGS = WARNINGS & Negate_Xbit(1, 8)
return
else
WARNINGS = (WARNINGS or 0) | 1
end
end
-- Only set velocity reference when pwms are enabled
if ((Motor.GetState() == MOTOR_RUN) and (throttleVoltage >= 0.5)) then
-- Calculate Voltage
--local rpm = ((throttleVoltage - THROTTLE_MIN_V) * MAX_RPM) / (THROTTLE_MAX_V - THROTTLE_MIN_V)
local rpm = ((throttleVoltage - THROTTLE_MIN_V) * GetMaxSpeed()) / (THROTTLE_MAX_V - THROTTLE_MIN_V)
-- Limit RPM
rpm = math.min(rpm, MAX_RPM)
rpm = math.max(rpm, MIN_RPM)
IO.Print("REF: ", rpm)
-- Set ref
Motor.SetReferenceVelocity(rpm)
end
-- Send warnings every 100ms
local CurrentTime = Time.GetMs()
if((StartTIme2 == nil) or (CurrentTime-StartTIme2) >= 100) then
SendWarnings()
end
end
Application.Stop = function ()
Motor.SetReferenceVelocity(0)
Motor.Disable()
--When eneble sw is activated go to start state
if (Digital.Get(ENABLE_SW) == DIN.ON) then
Application.NextState = "Start"
end
end
Application.Error = function ()
Motor.Disable()
Motor.SetReferenceVelocity(0)
--local ledValue = CANopen.GetObjectValue(LED_ID)
local throttleVoltage = Analog.Get(THROTTLE_IN)
local ErrorBlinkCounter = 0
local CurrentTime
--If bit 0 = 1 then OutOfBounds is detected
if (ERROR & 1) == 1 then
if throttleVoltage < (THROTTLE_MIN_V - DEADBAND) then
ERROR = ERROR | 2
ERROR_reg = ERROR_reg | 1 -- set the generic error register
elseif throttleVoltage > (THROTTLE_MAX_V + DEADBAND) then
ERROR = ERROR | 4
ERROR_reg = ERROR_reg | 1 -- set the generic error register
else
-- Clear ERROR bit 0, 1, 2
ERROR = ERROR & Negate_Xbit(7, 16)
-- Clear the generic error register
ERROR_reg = ERROR_reg | Negate_Xbit(1, 8)
end
end
-- Send Errors every 100ms
CurrentTime = Time.GetMs()
if ((StartTime1 == nil) or (CurrentTime - StartTime1) >= 100) then
StartTime1 = CurrentTime
SendError()
end
-- Determine how many times we want to blink the led
if ((ERROR & 2) >> 1) == 1 then
ErrorBlinkCounter = 2
elseif ((ERROR & 4) >> 2) == 1 then
ErrorBlinkCounter = 3
end
-- Start the blinking cycle if enough time has passed
CurrentTime = Time.GetMs()
if StartTime3 == nil or (CurrentTime - StartTime3) >= 3000 then
StartTime3 = CurrentTime
FlagCounter = 0
end
-- Handle the blinking logic
if FlagCounter < 2 * ErrorBlinkCounter then
if StartTime4 == nil or (CurrentTime - StartTime4) >= 300 then
StartTime4 = CurrentTime
FlagCounter = FlagCounter + 1
-- Toggle LED
--if ledValue == 0 then
if FlagCounter % 2 == 1 then
CANopen.SetObjectValue(LED_ID, LED.ON)
else
CANopen.SetObjectValue(LED_ID, LED.OFF)
end
end
else
-- Ensure the LED is off during the pause period
CANopen.SetObjectValue(LED_ID, LED.OFF)
end
if ERROR == 0 then
FlagCounter = 0
Application.NextState = "Idle"
return
end
end
function GetMaxSpeed()
if Digital.Get(DIRECTION_IN) == DIRECTION.FORWARD then
return CANopen.GetObjectValue(FORWARD_MAX_SPEED_ID)
end
return CANopen.GetObjectValue(REVERSE_MAX_SPEED_ID)
end
function SendError()
-- Send on ID + nodeID; we get the NodeId from CANopen off the inverter
local CanID = 0x80 + CANopen.GetObjectValue({0x100B, 0x00})
local byte0 = ERROR & 0xFF
local byte1 = (ERROR & 0xFF00) >> 8
local byte2 = ERROR_reg & 0xFF
CAN.Send(CanID,{byte0, byte1, byte2, 0, 0, 0, 0, 0})
end
function SendWarnings()
-- Send on PDO + nodeID;
local CanID = 0x180 + CANopen.GetObjectValue({0x100B, 0x00})
local byte0 = WARNINGS & 0xFF
CAN.Send(CanID,{byte0, 0, 0, 0, 0, 0, 0, 0})
end
function OutOfBounds(throttleVoltage, minVal, maxVal)
if (throttleVoltage < minVal) or (throttleVoltage > maxVal) then
return true
else
return false
end
end
--- Fuctino to negate bits
---@param value number Value to negate
---@param xBit number Number of bites e.g 16bit => xBit = 16
function Negate_Xbit(value, xBit)
local negated = 0
for i = 0, (xBit - 1) do
if (value & (1 << i)) == 0 then
negated = negated + (1 << i)
end
end
return negated
end
```
### 4.10 Example 10: Read protections of motor control in Lua
Purpose:
This script is designed to monitor and report various hardware errors in motor control systems, using Lua to check status registers for issues such as overtemperature, voltage discrepancies, and communication failures.
Description:
- Protection\_bits Table: Lists each error with a unique bitmask for identification.
- Initialize Function: Sets initial conditions, including the loop frequency.
- Loop Function: Repeatedly retrieves the current error status, checks each potential error against the current status, and prints messages for any active errors.
Usage:
It is best to use only the protections that you need to check or send. By doing this, you can make the `Protection_bits` table smaller, which in turn reduces memory usage—a crucial consideration in environments with limited resources. Either way, if the value returned from the function is greater than 0, an error has occurred.
```lua
local Errors = {}
local Protection_bits = {
{0x1, "sw_phase_error"},
{0x2, "sw_DC_link_overvoltage_error"},
{0x4, "sw_DC_link_undervoltage_error"},
{0x8, "bridge_overtemperature_error"},
{0x10, "capacitor_overtemperature_error"},
{0x20, "motor_overtemperature_error"},
{0x40, "current_offset_error"},
{0x80, "CAN_command_timeout_error"},
{0x100, "system_self_test_failed_error"},
{0x800, "motor_feedback_error"},
{0x8000, "CAN_communication_error"},
{0x10000, "logic_supply_monitor_error"},
{0x20000, "dc_link_overvoltage_comparator_error"},
{0x80000, "gatedriver_error"},
{0x100000, "HV_interlock"},
{0x200000, "motor_temperature_sensor_fail"},
{0x400000, "capacitor_temperature_sensor_fail"},
{0x800000, "bridge_temperature_sensor_fail"},
{0x1000000, "bridge_fault"},
{0x2000000, "logic_supply_fault"},
{0x4000000, "bus_bar_fault"},
{0x8000000, "system_initialization_error"},
{0x10000000, "fault_Vrefs_chip"},
{0x20000000, "application_error_state"},
{0x40000000, "motor_control_error"}
--{0x80000000, "error_extended"}
}
-- Initialize
function Initialize()
LoopPeriodMs = 10
end
function Loop()
local protections = Motor.GetProtectionsLow()
for i = 1, #Protection_bits do
local bitmask = Protection_bits[i][1]
local varname = Protection_bits[i][2]
Errors[i] = {bitmask = bitmask, name = varname, state = (protections & bitmask) == bitmask}
end
-- Example usage to print all active errors
for i = 1, #Errors do
if Errors[i].state then
IO.Print("Error detected: " .. Errors[i].name)
end
end
end
```
## 5. Benchmark
### 5.1 Examples for benchmark:
#### 5.1.1 00\_Empty\_script
```lua
function Initialize()
LoopPeriodMs = 10
end
function Loop()
end
```
#### 5.1.2 01\_GetObject
```lua
function Initialize()
LoopPeriodMs = 10
end
function Loop()
for i = 1,100 do
CANopen.GetObjectValue({0x30B0, 0x04})
end
end
```
#### 5.1.3 02\_GetObject\_with\_library
```lua
function Initialize()
LoopPeriodMs = 10
end
function Loop()
for i = 1,100 do
Digital.Get(DIGITAL_IN_4)
end
end
```
#### 5.1.4 03\_GetSet
```lua
function Initialize()
LoopPeriodMs = 10
end
function Loop()
for i = 1,50 do
local throttle = CANopen.GetObjectValue({0x3090, 0x01})
CANopen.SetObjectValue({0x3010, 0x05}, throttle * 40) --at 4.5V = 180RPM
end
end
```
#### 5.1.5 04\_GetSet\_with\_library
```lua
function Initialize()
LoopPeriodMs = 10
end
function Loop()
for i = 1,50 do
local throttle = Analog.Get(ANALOG_IN_1)
Motor.SetReferenceVelocity(throttle * 40) --at 4.5V = 180RPM
end
end
```
### 5.2 Results
We loaded each script onto the inverter and started the "Resource Manager." We ran the script for a specific period and logged the variables to a live chart, from which we then created the following table:
Examples from 05 onwards can be found under the title 4. Examples.
Table 55: Script benchmark tests| **Name of script**
| **RAM usage \[kB\]**
| **RAM free
\[kB\]**
| **RAM used
\[%\]**
| **Avg. loop duration \[us\]**
| **Compile time \[ms\]**
| **Initialization time \[ms\]**
|
| 00\_Empty\_script | 11.800 | 24.040
| 33 | 13 | 2.7 | 0.175 |
| 01\_GetObject | 11.728 | 24.112 | 33 | 5000 | 2.9 | 0.173 |
| 02\_GetObject\_with\_library | 11.784 | 24.056 | 33 | 510 | 2.94 | 0.241 |
| 03\_GetSet | 12.088 | 23.752 | 34 | 5000 | 3.178 | 0.177 |
| 04\_GetSet\_with\_library | 12.128 | 23.712 | 34 | 450 | 3.149 | 0.174 |
| 05\_Timer\_example\_4\_1 | 12.064 | 23.776 | 34 | 500407 | 3.294 | 0.242 |
| 06\_Timer\_example\_4\_2 | 12.200 | 23.640 | 34 | 17 | 3.669 | 0.177 |
| 07\_Timer\_example\_4\_3 | 12.232 | 23.608 | 34 | 19 | 3.747 | 0.175 |
| 08\_Example\_5 | 12.104 | 23.736 | 34 | 18 | 4.332 | 0.213 |
| 09\_Example\_6 | 15.512 | 20.328 | 43 | 9 | 3.468 | 0.225 |
| 10\_Example\_7 | 22.048 | 12.792 | 63 | 125 | 3.506 | 0.191 |
| 11\_Example\_8\_1 | 13.472 | 22.368 | 38 | 110 | 5.030 | 0.293 |
| 12\_Example\_8\_2 | 13.072 | 22.768 | 36 | 50 | 4.628 | 0.250 |
| 13\_Example\_9 | 21.112 | 14.728 | 59 | 250 | 15.756
| 0.742 |
![Ram used [%]](http://help.emsiso.com/uploads/images/gallery/2024-07/embedded-image-3chsvi0d.png)
![Average loop time [us]](http://help.emsiso.com/uploads/images/gallery/2024-07/embedded-image-znzcz6k9.png)
Examples 01, 03, and 05 have too much loop time and were excluded from the chart.
As you can see from the table and charts, reading and writing values directly from the CANopen stack takes longer than using our library. For example, the 01\_GetObject example has an average loop time execution of 5ms, whereas the 02\_GetObject\_with\_library example has an average time of 510µs, which is approximately 10 times faster. Based on these results, it is better to use functions that directly interact with the inverter instead of the CANopen stack, where possible.
We can also see that the delay function used in example 05\_Timer\_example\_4\_1 has a very long loop time because we used the delay to blink an LED. This function must be used with caution and only for small delays if you have no other option.
For writing applications, we recommend using a state machine, which is more reliable. With a state machine, you have more control over what happens in each state and can properly define the transitions between states.
In section "5.3 Live chart data for each example", we can see the loop time, RAM used and RAM free for a specific time period. We can se that we have some spikes in loop time, which can indicate that some specific part of the code was executed or that the script was interrupted with a higher priority task. We can also see that the RAM usage can very based on which part of the code is executed.
### 5.3 Global variables benchmark
In this section, we will demonstrate how the number of global variables affects script RAM usage and loop execution time.
Below is the code that will be used to test 10 global variables. We will increase the number of global variables to 20, 30, 100, and 150, but the principle will remain the same
```lua
Global1 = 1
Global2 = 1
Global3 = 1
Global4 = 1
Global5 = 1
Global6 = 1
Global7 = 1
Global8 = 1
Global9 = 1
Global10 = 1
function Initialize()
LoopPeriodMs = 10
end
function Loop()
IO.Print(Global1)
IO.Print(Global2)
IO.Print(Global3)
IO.Print(Global4)
IO.Print(Global5)
IO.Print(Global6)
IO.Print(Global7)
IO.Print(Global8)
IO.Print(Global9)
IO.Print(Global10)
end
```
In the table below, we recorded the data for different sets of global variables. We can observe that as the number of global variables increases, the compile time, initialization time, loop execution time, and RAM usage all increase. It is important to remember that we are limited by the loop execution time set in the initialize() function. If we exceed that time, we encounter an error.
More importantly, we need to carefully manage the number of global variables because excessive use can lead to memory overflow. As shown in the table below, having 150 global variables consumes around 75% of the RAM, but our code has almost no functionality. If we add the following code right after the Loop() function:
```lua
for i = 1,50 do
local throttle = CANopen.GetObjectValue({0x3090, 0x01})
CANopen.SetObjectValue({0x3010, 0x05}, throttle * 40) --at 4.5V = 180RPM
end
```
We see that the RAM usage jumps to 98%. This shows that RAM usage depends not only on the number of global variables but also on the quality of the code itself. Therefore, we need to write efficient code, which means avoiding the use of global variables, using local variables, and implementing proper algorithms.
For these reasons, it is difficult to specify the maximum number of global and local variables. We recommend testing your script continuously during development.
Table 56: How the number of globals affect the execution of a script| **Number of globals**
| **RAM usage \[kB\]**
| **RAM free
\[kB\]**
| **RAM used
\[%\]**
| **Avg. loop duration \[us\]**
| **Compile time \[ms\]**
| **Initialization time \[ms\]**
|
| 10 globals
| 12.656 | 23.184 | 35 | 200 | 3.874 | 0.257 |
| 20 globals | 14.480 | 21.360 | 40 | 380 | 4.942 | 0.412 |
| 30 globals | 14.688 | 21.152 | 41 | 650 | 6.018 | 0.591 |
| 100 globals | 25.408 | 10.432 | 71 | 2000 | 13.5 | 0.795 |
| 150 globals | 26.976 | 8.864 | 75 | 3110 | 18.4 | 1.276 |
| 150 globals + 4 lines of code | 35.072 | 768 | 98 | 8000 | 18.9 | 1.213 |
## 6. Best practices
For further insights and practical tips, I recommend exploring "Programming in Lua," available at: [Programming in Lua](https://www.lua.org/gems/). Authored by experts in the field, this comprehensive resource offers invaluable guidance for Lua developers. It's worth noting that the entire topic is accessible free of charge as of April 24, 2024. Additionally, some sections of the topic include examples to further illustrate key concepts and techniques.
### 6.1 Minimizing Global Variables
The most common problem with Lua scripting occurs when the script becomes "big" and the programmer uses only or to much global, resulting in an "out of memory" error. In Lua scripting, it's imperative to exercise caution with global variables to prevent memory exhaustion and script failures, especially on embedded systems. Emphasizing the utilization of local variables whenever possible is paramount. By minimizing global variable usage, we mitigate the risk of memory overflow and enhance script performance.
## 7. Known issues and limitations
This section describes known issues and limitations, their causes, and solutions or mitigations if they exist.
### 7.1 Issues
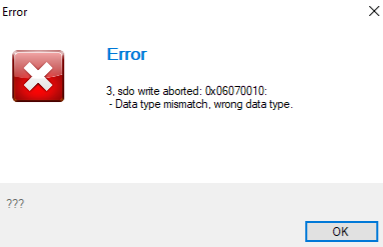
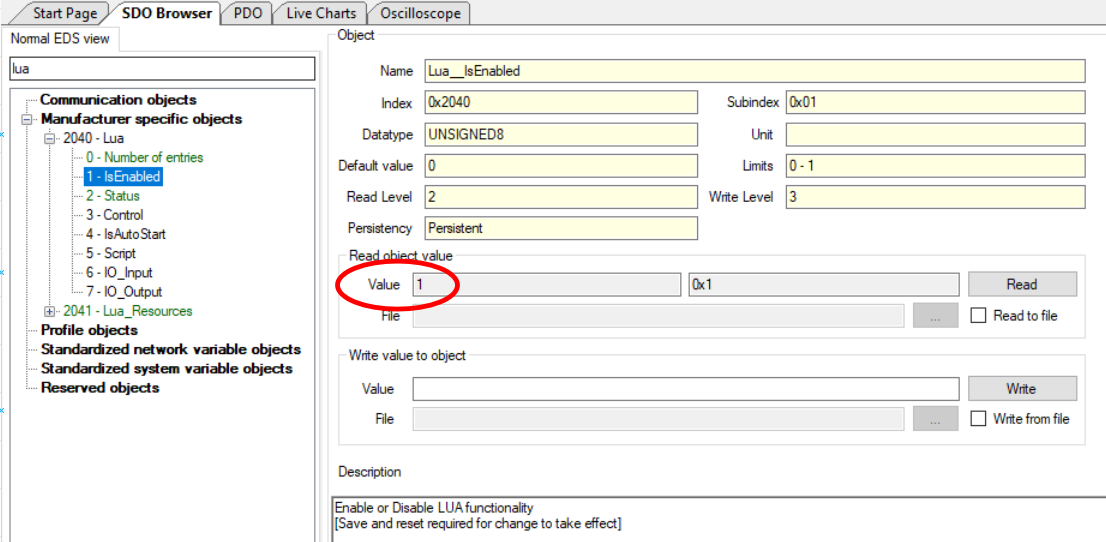
#### 7.1.1 Lua is not enabled
Error 0x06070010 when loading a script may indicate Lua object 0x2040 0x01 isn't set to 1. To resolve, ensure proper access level in Configurator to unlock this feature. If you do not have the proper access level contact us.
[](http://help.emsiso.com/uploads/images/gallery/2024-04/YPqimage.png)
[](http://help.emsiso.com/uploads/images/gallery/2024-04/jl3image.png)
#### 7.1.2 Output object out of memory error
When reading an output object whose value is periodically changing by the script, it is possible that an "Out of memory" error, as shown in Figure 8, may be reported by the emDrive Configurator.
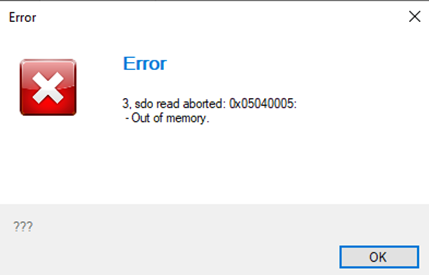
**Cause**: unsynchronized reading and writing to output object by script and emDrive Configurator at the same time.
**Solution:** read output object again.
#### 7.1.3 IO.Print() isn't functioning
If *IO.Print()* isn't functioning, it may signal an outdated firmware version. FW 1.12.2 - lacks support, while FW 1.13.2 onwards enables the function.
#### 7.1.4 Protections
If multiple protections are active, the CANopen read wont work for the protection object. (New FW will fix this issue)